
`
24 Free X-Particle project files to download and dissect, plenty of useful setups to learn from.
These files are from an original post I made back in December 2016 as an Xmas Advent Calendar gift. I thought it would be good to keep these files available as there are some great X-Particles setups and insights amongst this collection to learn from.
I’ve kept the original files in the download, if my memory serves me correctly, they were created in Cinema 4D R18 with X-Particles 3.5. Plus, I also updated all the scene files to Cinema 4D R23 with X-Particles 4. This means some scenes use Fields now instead of falloff, which is a good thing.
I built these files from my library of presets which I’ve been collecting ever since I started using X-Particles. I didn’t necessarily create all these set-ups, they may have been shared online by others. The credit should really go to the amazing collection of artists from around the world who are generous enough to share their knowledge and inspire us all.
Download the files from the button below followed by descriptions of each preset.
Get Started

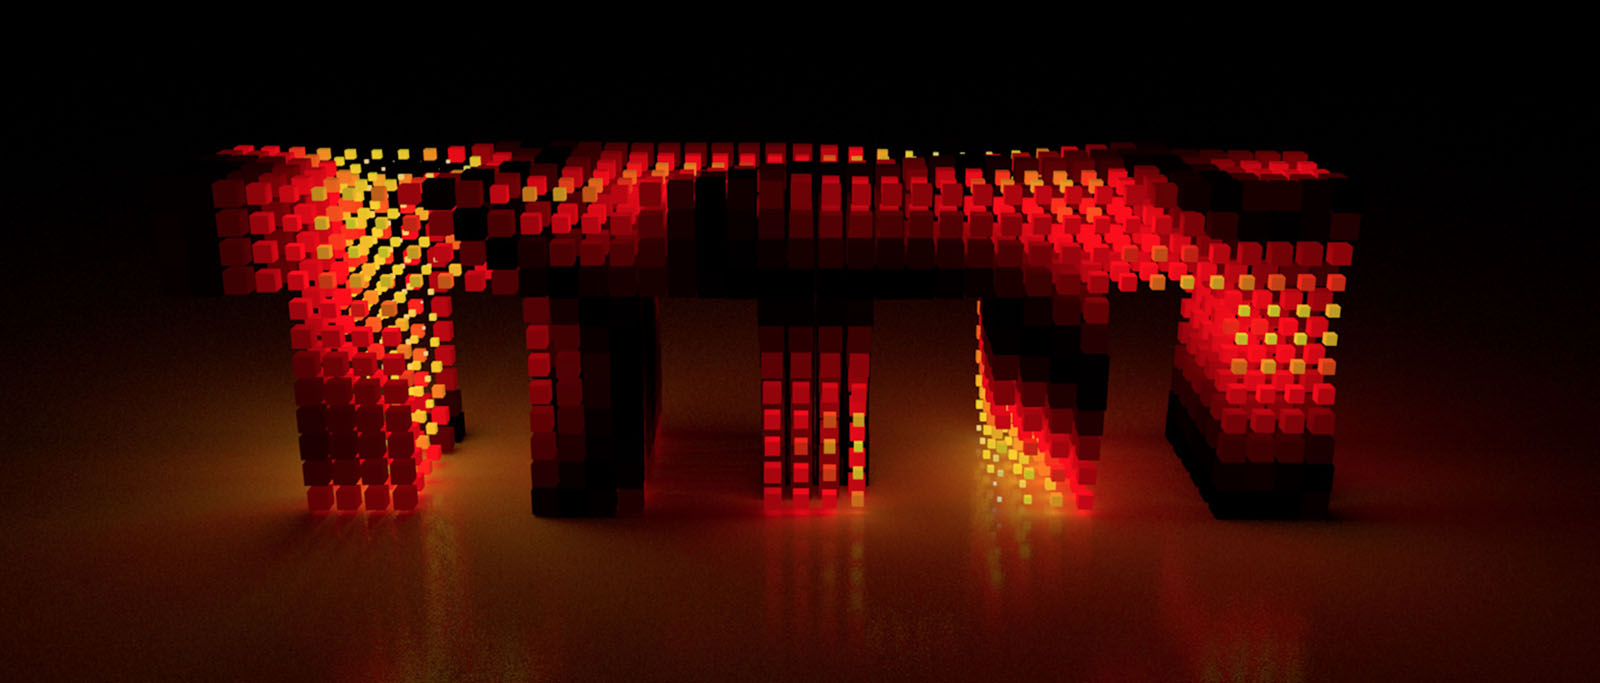
<h2style=”text-align: center;”>xpSnowflake
Let’s start with a slightly festive set-up. This simple scene uses the xpBranch modifier to create one arm of this growing snowflake. The xpTrail object is used to create splines from the particle path and then this is cloned radially using the MoGraph Cloner.
You can create unique snowflakes by changing the xpEmitter Random Seed parameter, found in the Advanced Tab and you can manipulate the shape by adjusting the xpBranch Modifier Branch Length spline.
xpCoverSpawn
This set-up uses the xpCover and xpSpawn modifiers (hence the title). Basically we fire a whole bunch of particles towards an object, and when the particles hit the object, they spawn more particles. It is a useful set-up if you need dust or debris on collision.
Notice from the screenshot above that we also have a question. This determines whether the particles have collided with an object, and if so, trigger the xpSpawn modifier for the collided particle. For the collision to be detected, I’ve also added the xpCollision Tag to the sphere object.
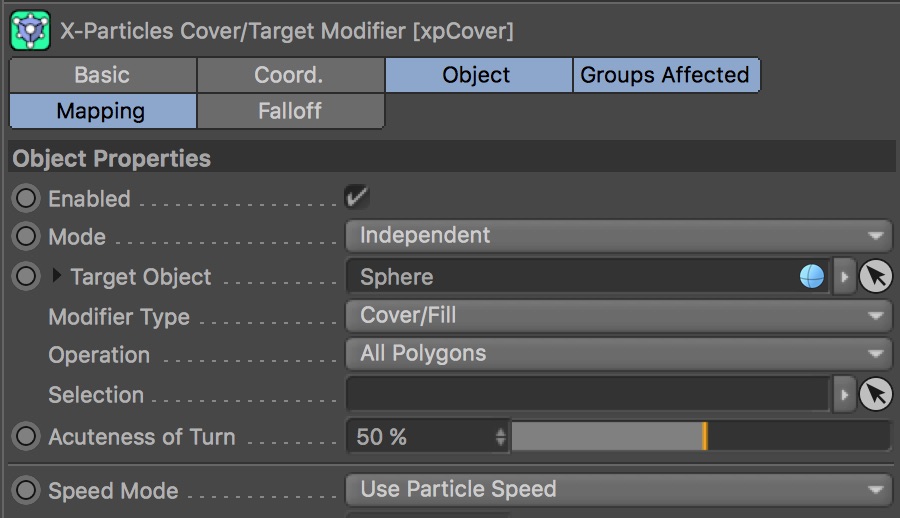
The xpCover Modifier allows you to either target an object, or cover/fill an object. Use the Acuteness of turn to control how quickly the particles turn to the object once influenced by the modifier. The tolerance is the minimum distance that the particle must be from its target before the particle will snap to the object.
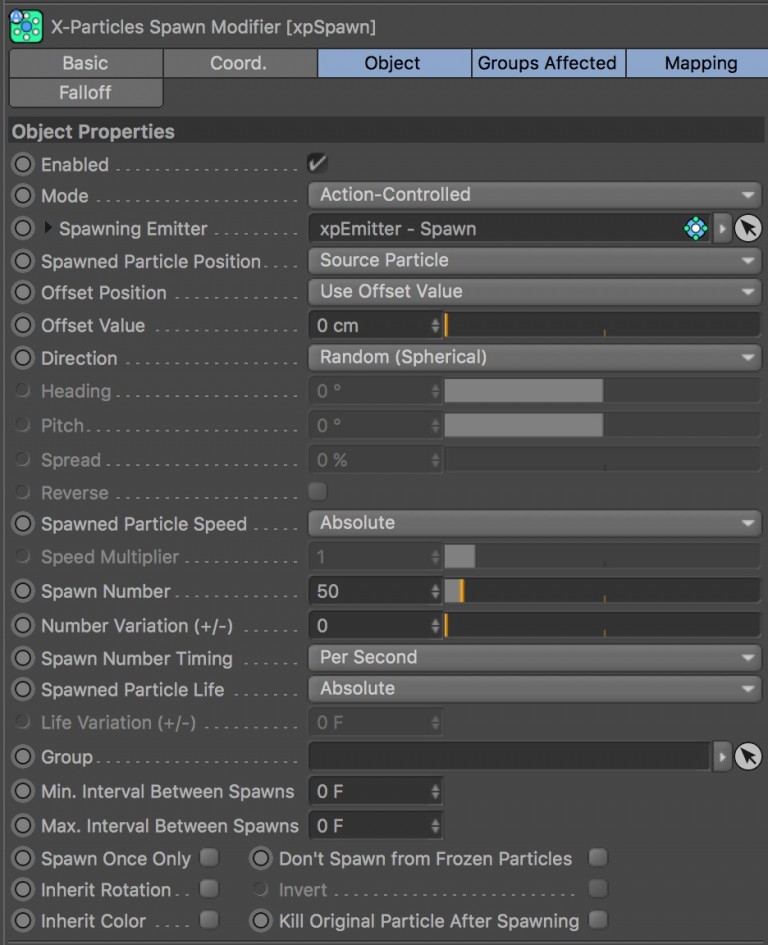
Once collided, the question triggers the xpSpawn modifier which uses the collided particle position as the spawned particle position. The particles are emitted in a random spherical direction, but you can choose from various other options depending on required usage. It’s worth noting that to create spawning with X-Particles, you must add an additional emitter to spawn the particles from.
As you can see, this is a fairly simple set-up, but one that introduces you to xpCover and xpSpawn, both very powerful and useful modifiers.
xpGeneratorAnimationScale
This set-up shows you how to use the X-Particles Generator object to adjust the timing of animated objects which are used as particles.
First, I emit some particles onto the surface of the landscape object.
In this scene we have a couple of primitives with animated parameters, these are added as children to the xpGenerator object which means they will be rendered for each particle in the scene (from this emitter).
The xpGenerator object has the option to enable or disable any animation on it’s children, plus the added ability to scale or offset the animation. Scaling will speed up or slow down the animation (and add some variation to the speed of the animation). Offset will allow you to move the animation forwards or backwards in time so all the particles animate offset from each other.

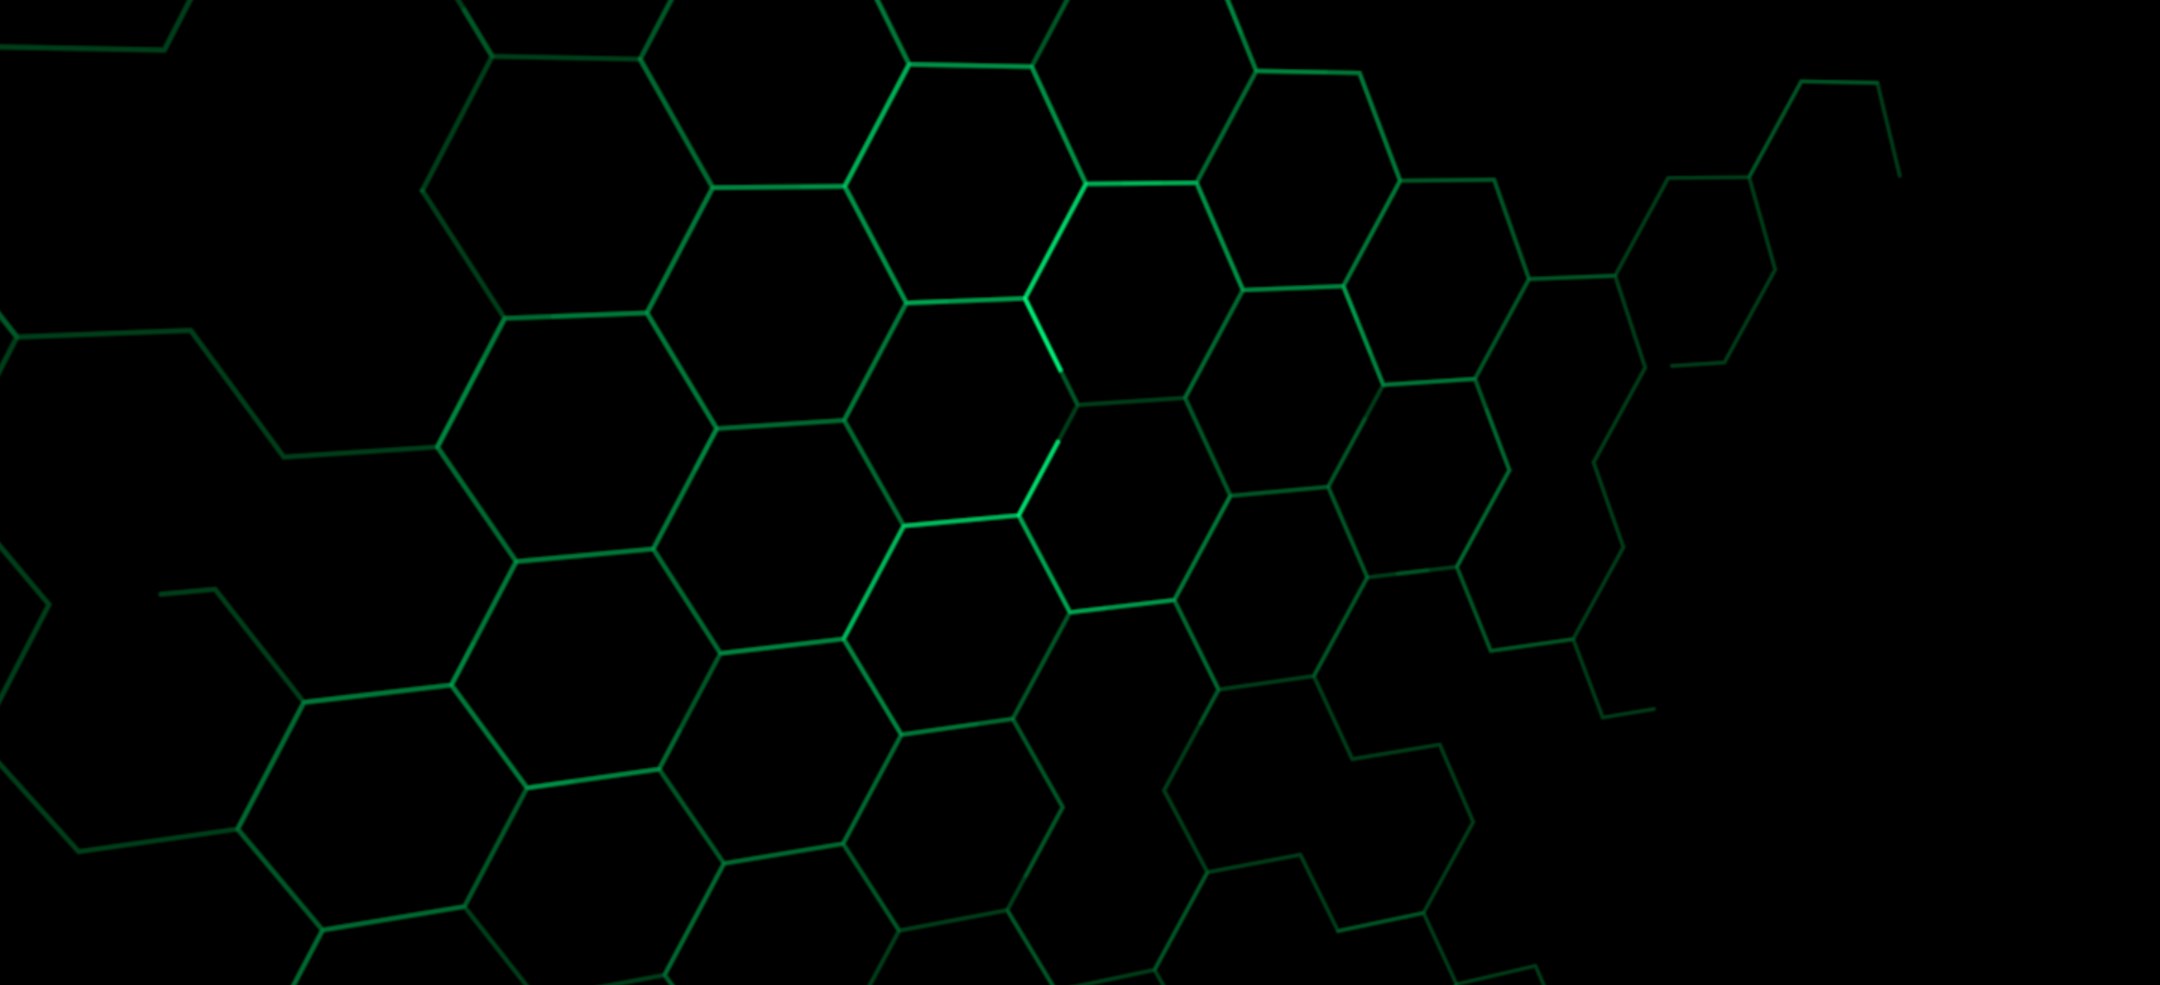
xpHoneycomb
This set-up will draw a honeycomb hexagonal grid using a combination of xpNetwork set to use an angle of 60° for the hexagonal motion, combined with the xpTrail generator.
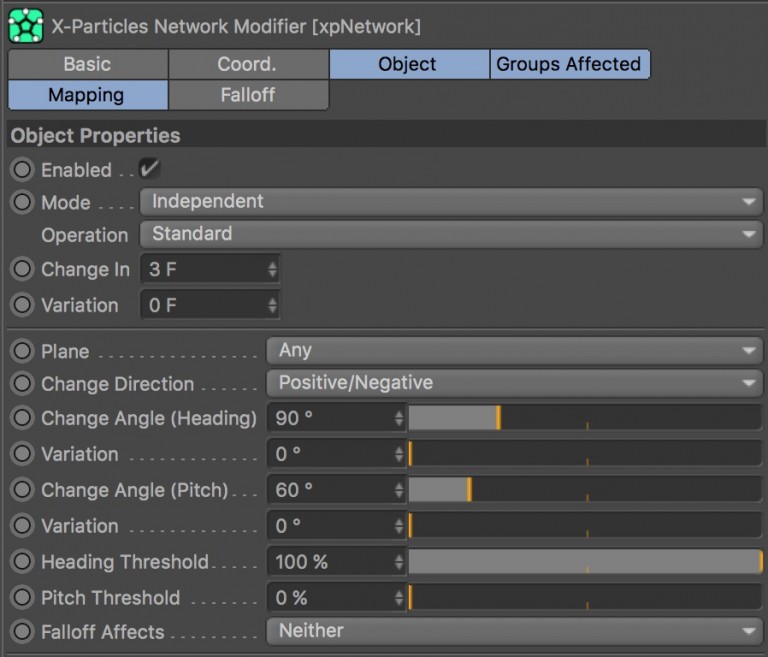
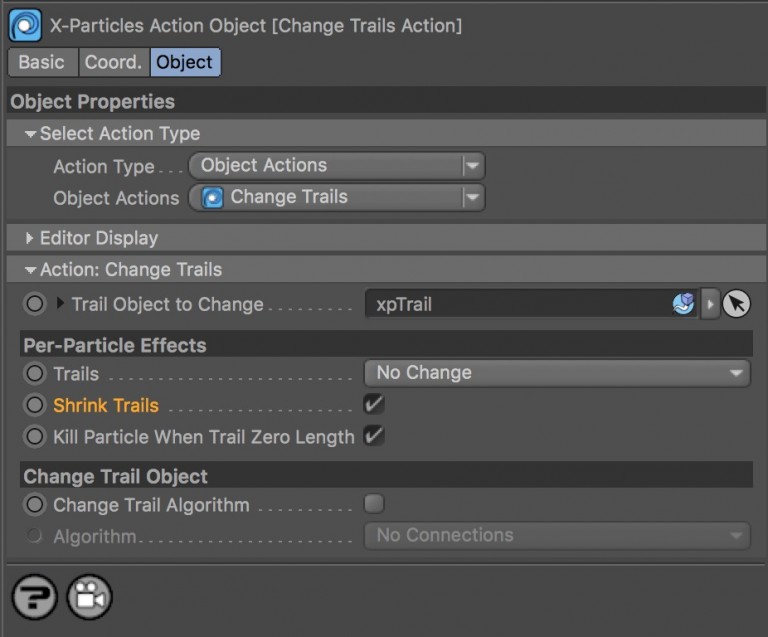
When the particle age is greater than 50, the Particle Age question triggers the xpFreeze modifier, to er, freeze the particles. The question also triggers the Change Trails Action which is set to shrink the trails. This has the effect of the trail drawing on and then shrinking away.

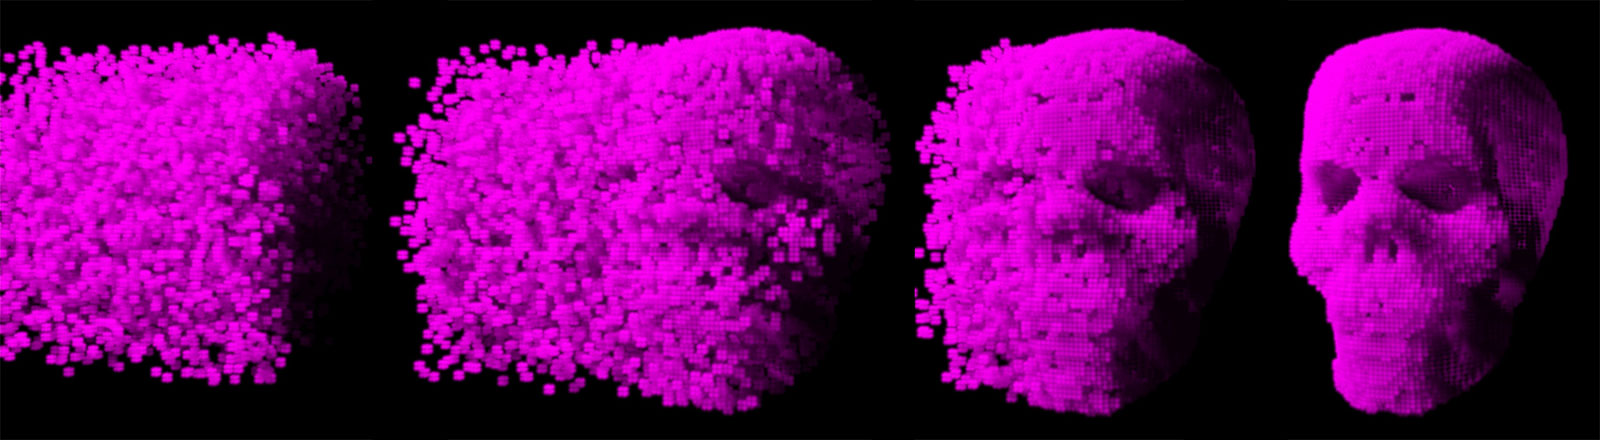
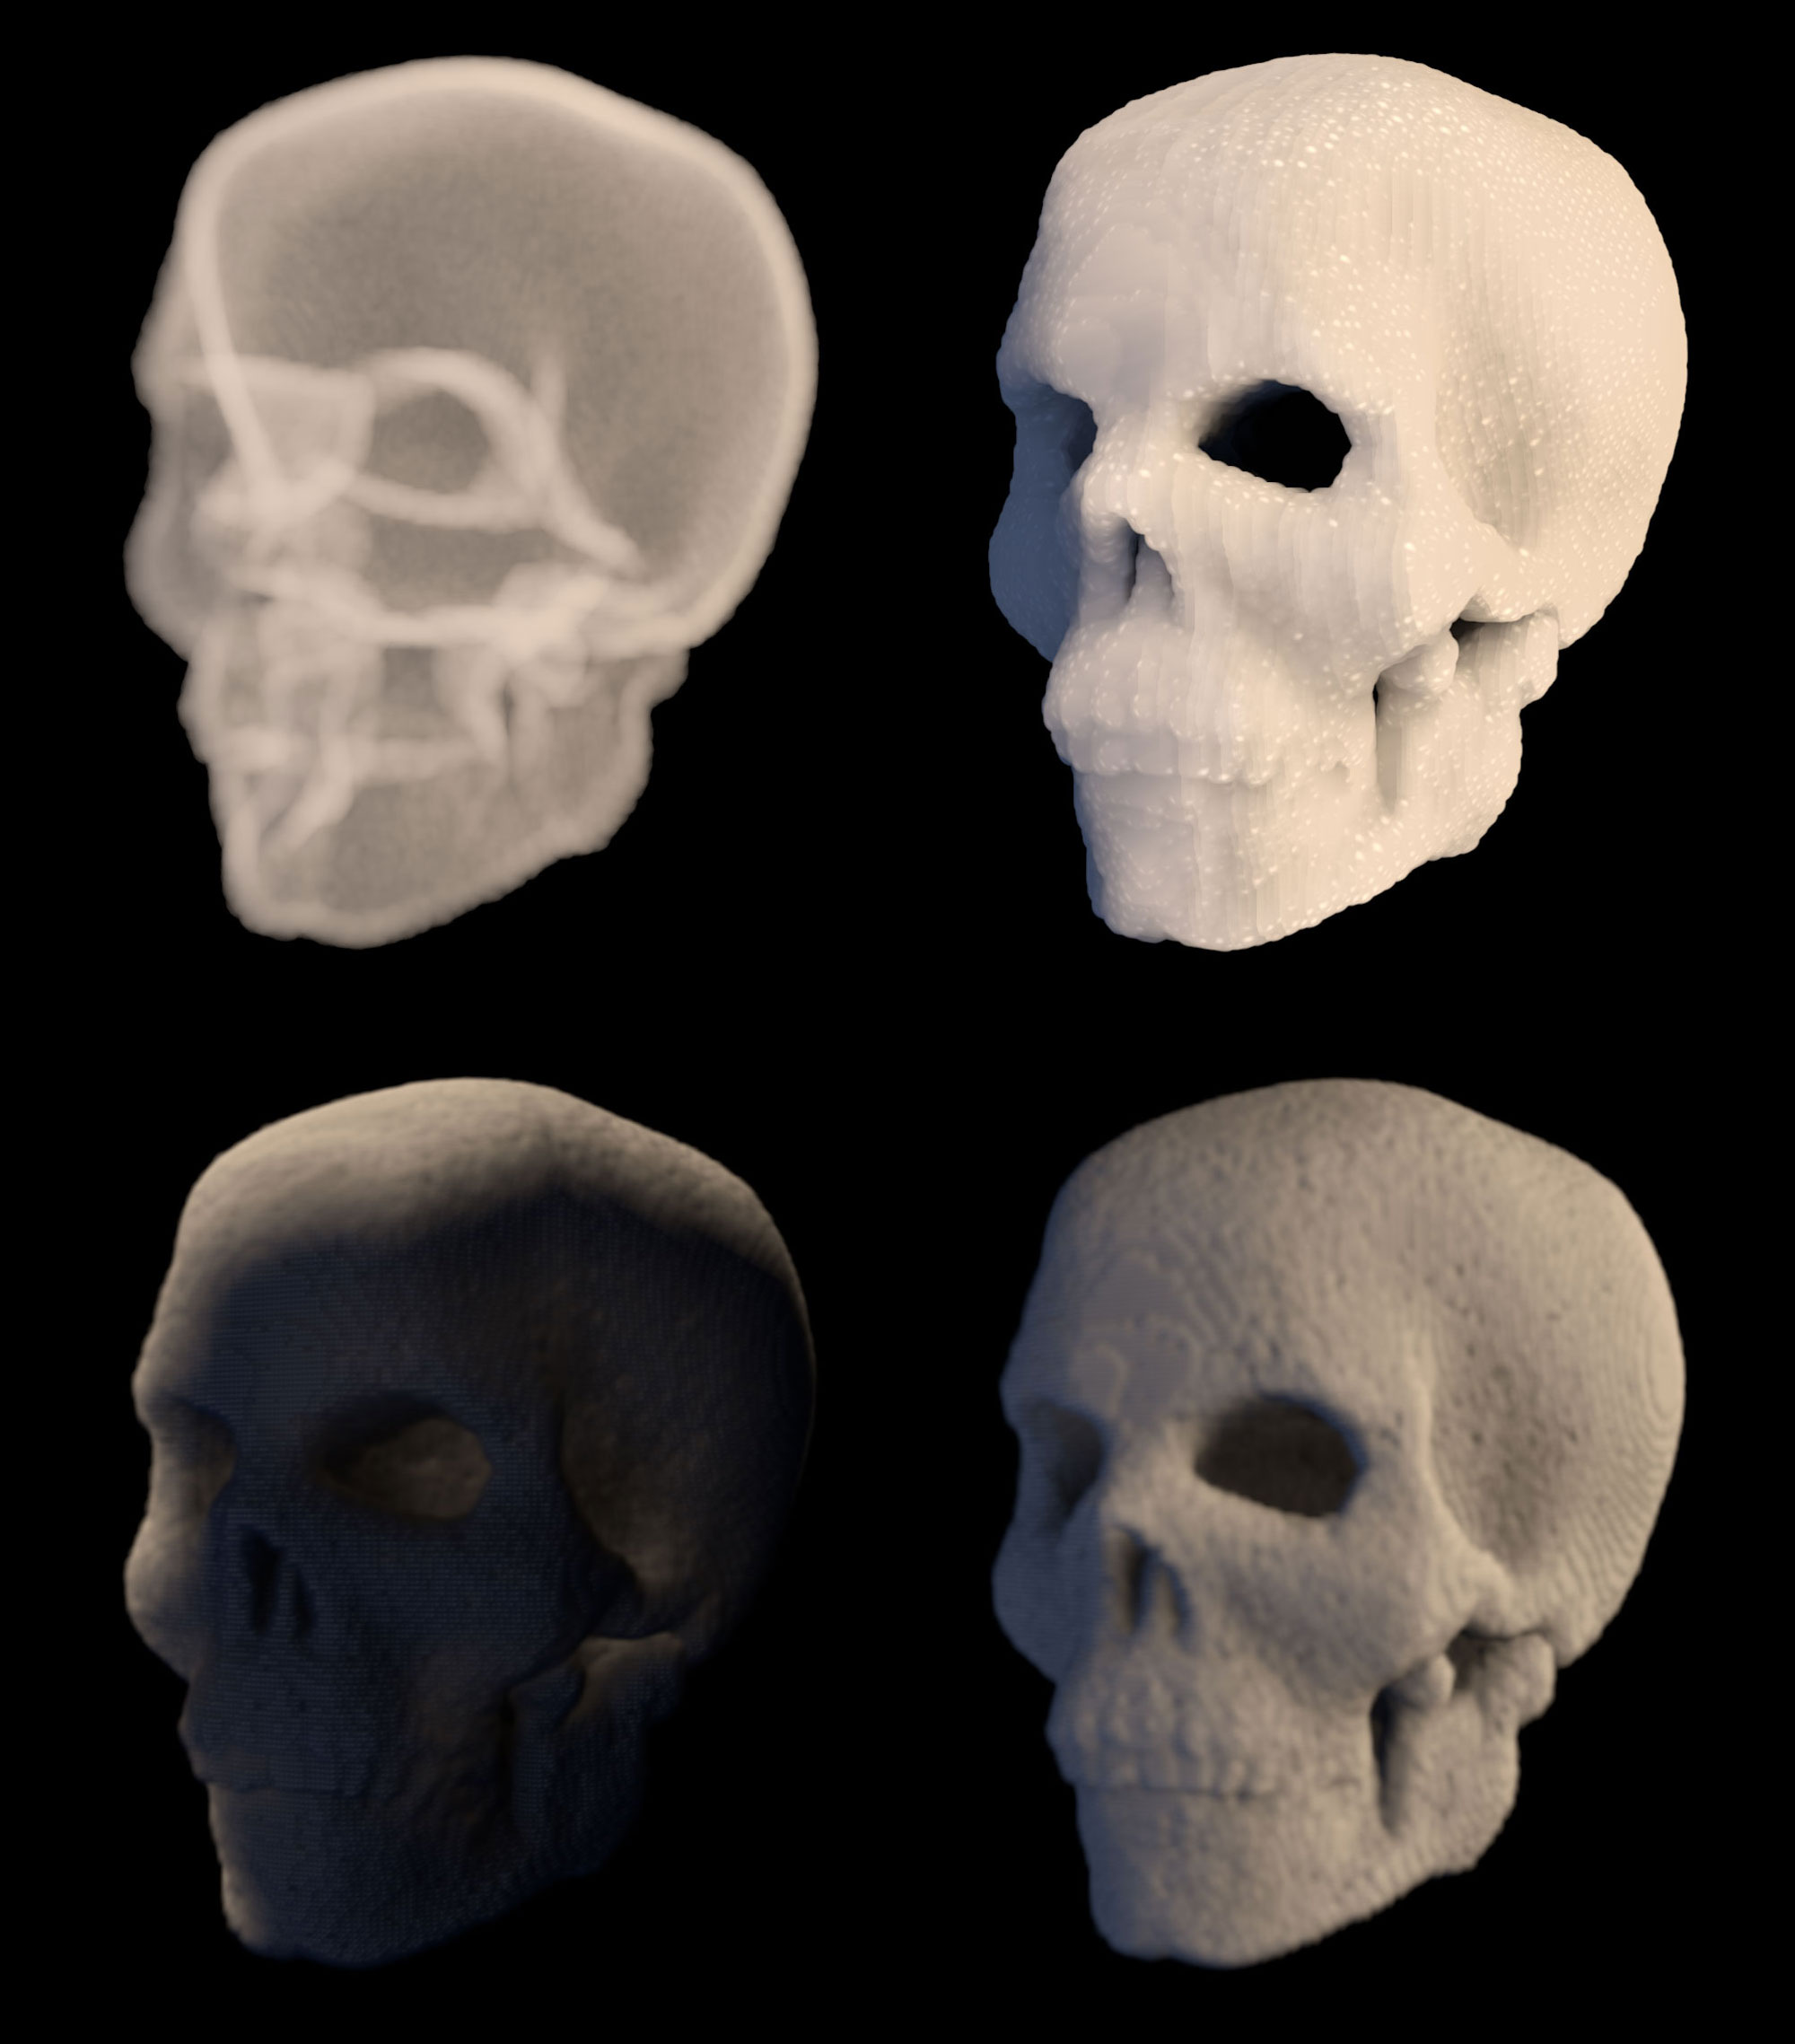
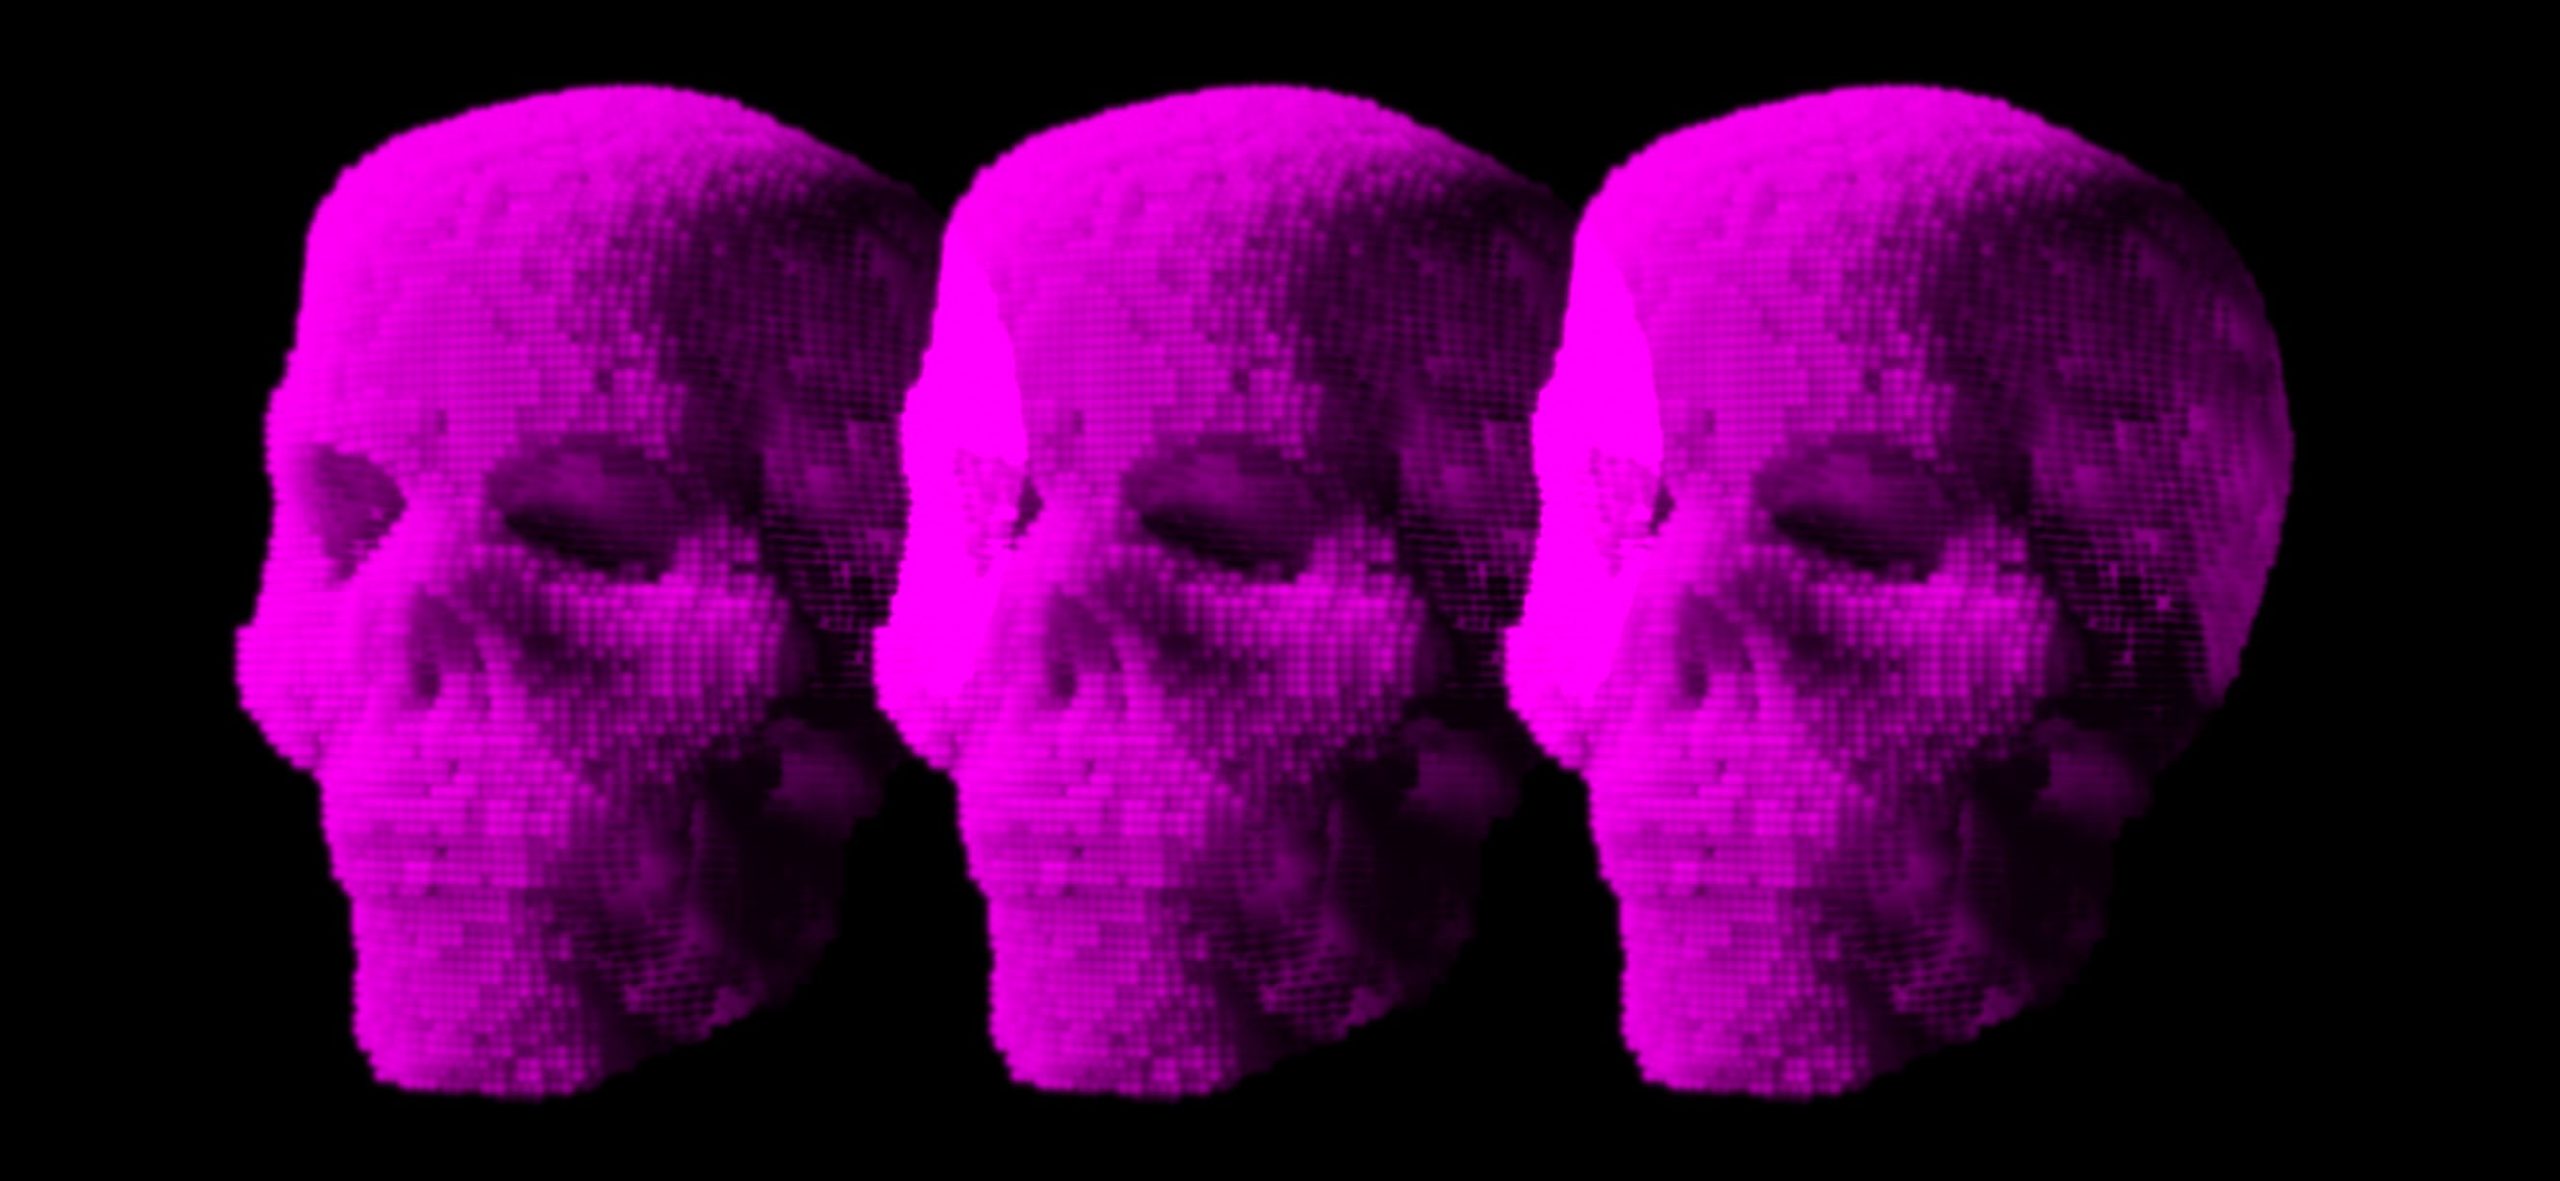
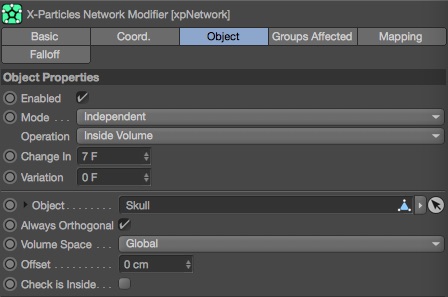
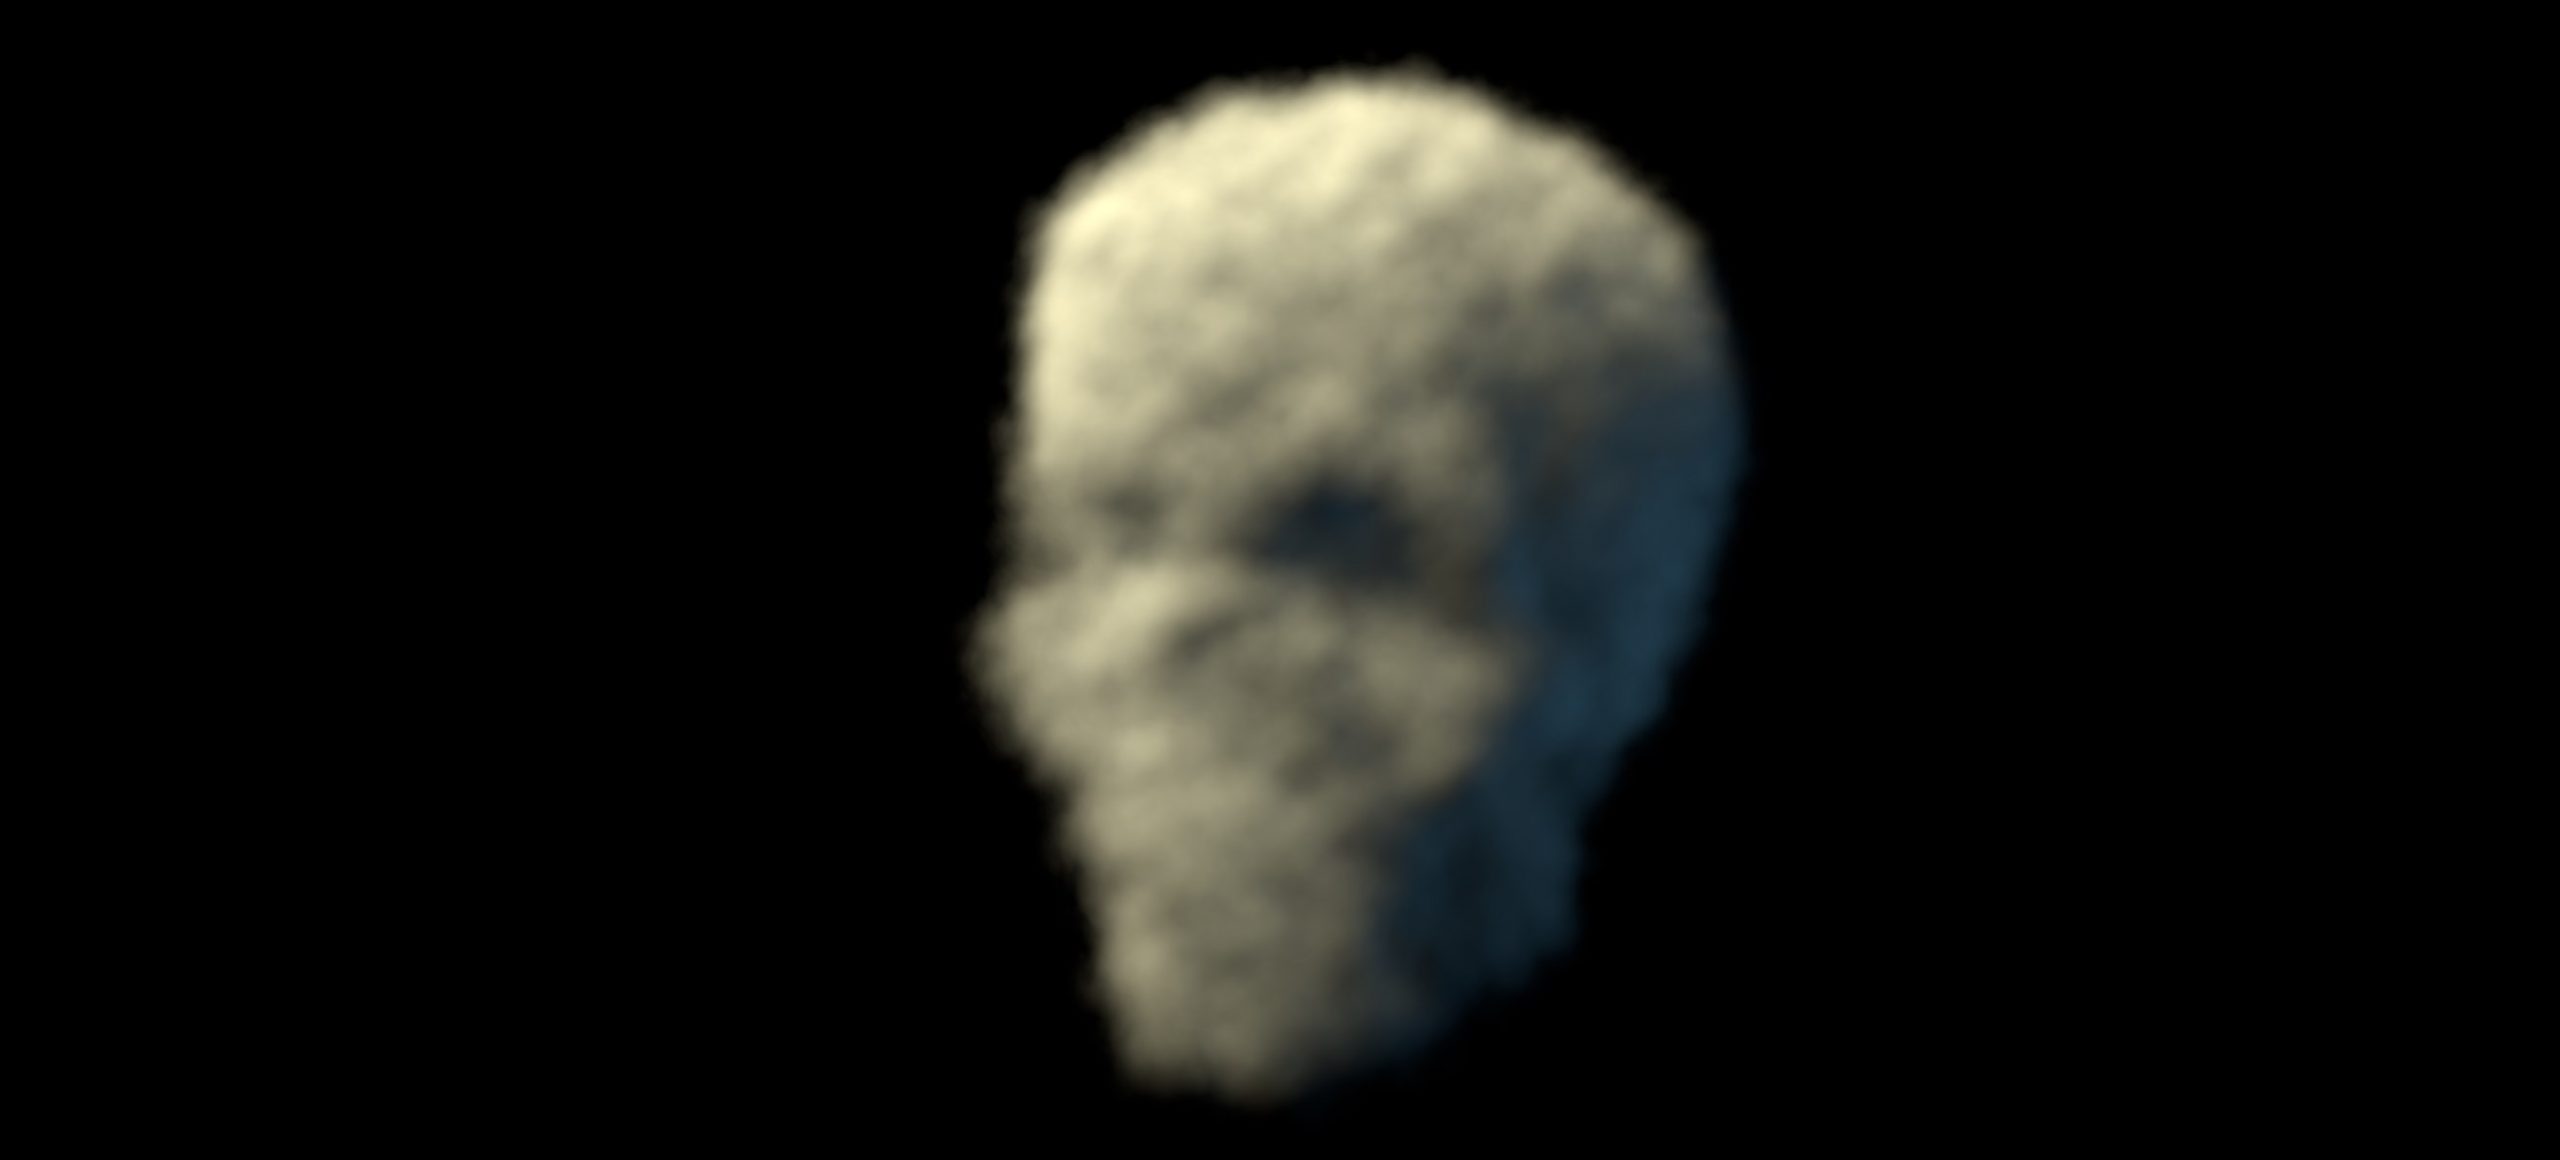
xpVolumetricSkull
The XP Material is capable of volumetric renderings of your particles. In this example there is no animation, I’ve emitted a bunch of particles on the surface of a skull and then added a couple of lights. The XP Material has a Volumetric Tab where I’ve reduced the density down low and rendered using voxels.
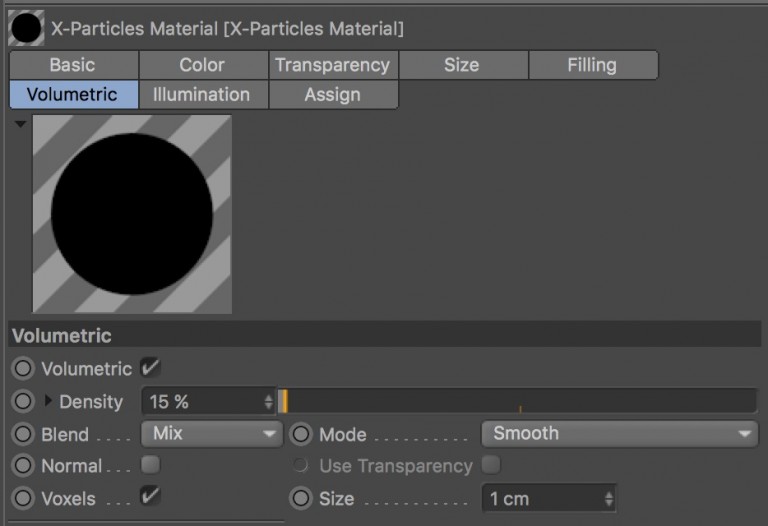
Here are a few more examples of the kind of results you can achieve by changing the density of the volumetrics and rendering using various colour or transparency adjustments. Experiment with the scene in the download as there are a million other looks waiting to be rendered.
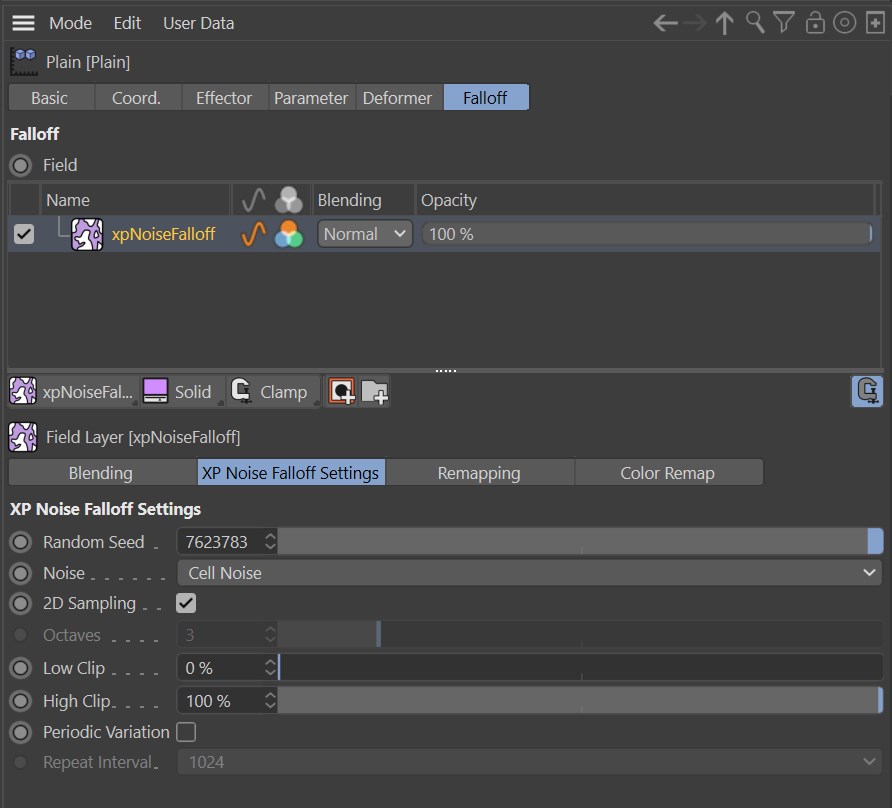
xpNoiseFalloff
This scene uses the xpNoiseFalloff with some regular MoGraph objects. Made using the Cloner Grid Array, with Object as the form type. You then drag your object into the field and the result is a nice regular array of clones that are only visible within the geometry you choose. This is an R18 feature, but xpNoiseFalloff will still work fine on pre-R18 MoGraph projects.
The Plain Effector is set to scale the clones to -1 and also to affect the colour of the clones (it turns them white). Switch to the Falloff Tab and there I’ve used xpNoiseFalloff as the falloff shape. This means we have noise controlling the falloff strength of the effector, rather than a regular shape like a sphere or box.
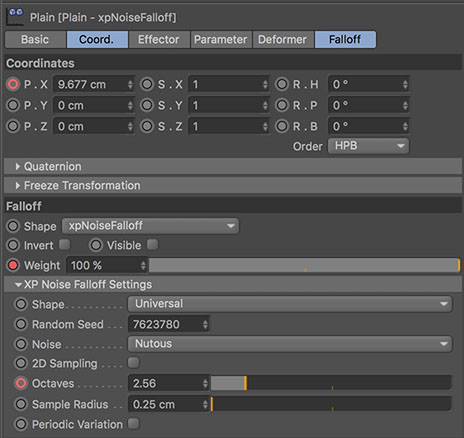
Since this original post, Fields have been introduced in Cinema 4D and replaced the older falloff you see above. In the download, we included an older X-Particles 3 version with Falloff, plus a new updated version with X-Particles 4 and the xpNoiseFalloff Field.

xpConstraintBlob

This blobby action is created by using the X-Particles xpConstraints Object. This basically creates a constraint between the particles which holds them together. It is not a rigid constraint, more like a virtual spring. You can see from the Attribute Manager settings below that I have enabled Connection at Birth, Collisions and Viscosity. This will hold the particles together, detect collisions between the particles and give them a viscous consistency.
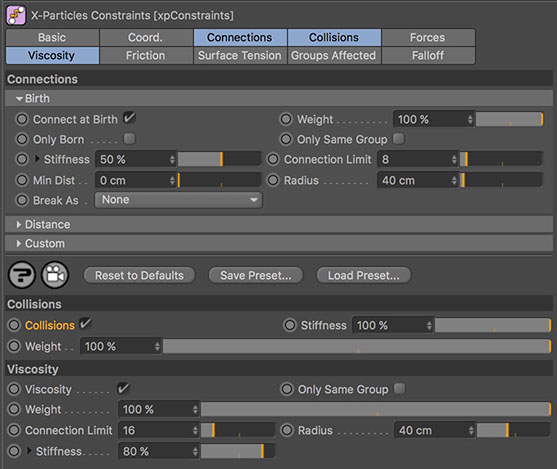
In the C4D file you can download below, it is advisable to select the xpCache and click the Build Cache button before trying to play back the simulation. You should also cache the particles if you wish to render over a network.
If you use xpConstraints in a new scene, you will see a different result. The particles constraints will probably break and not hold tightly together. This is because you need to increase the sub-steps, and also the number of iterations that take place on each frame. This will improve the accuracy of the constraints and also make the connections stiffer. The downside is that it will slow things down, the higher the iterations, the slower the simulation. Try playing around with the iterations, reduce it by half and then cache the result to see how it influences the particle constraints.

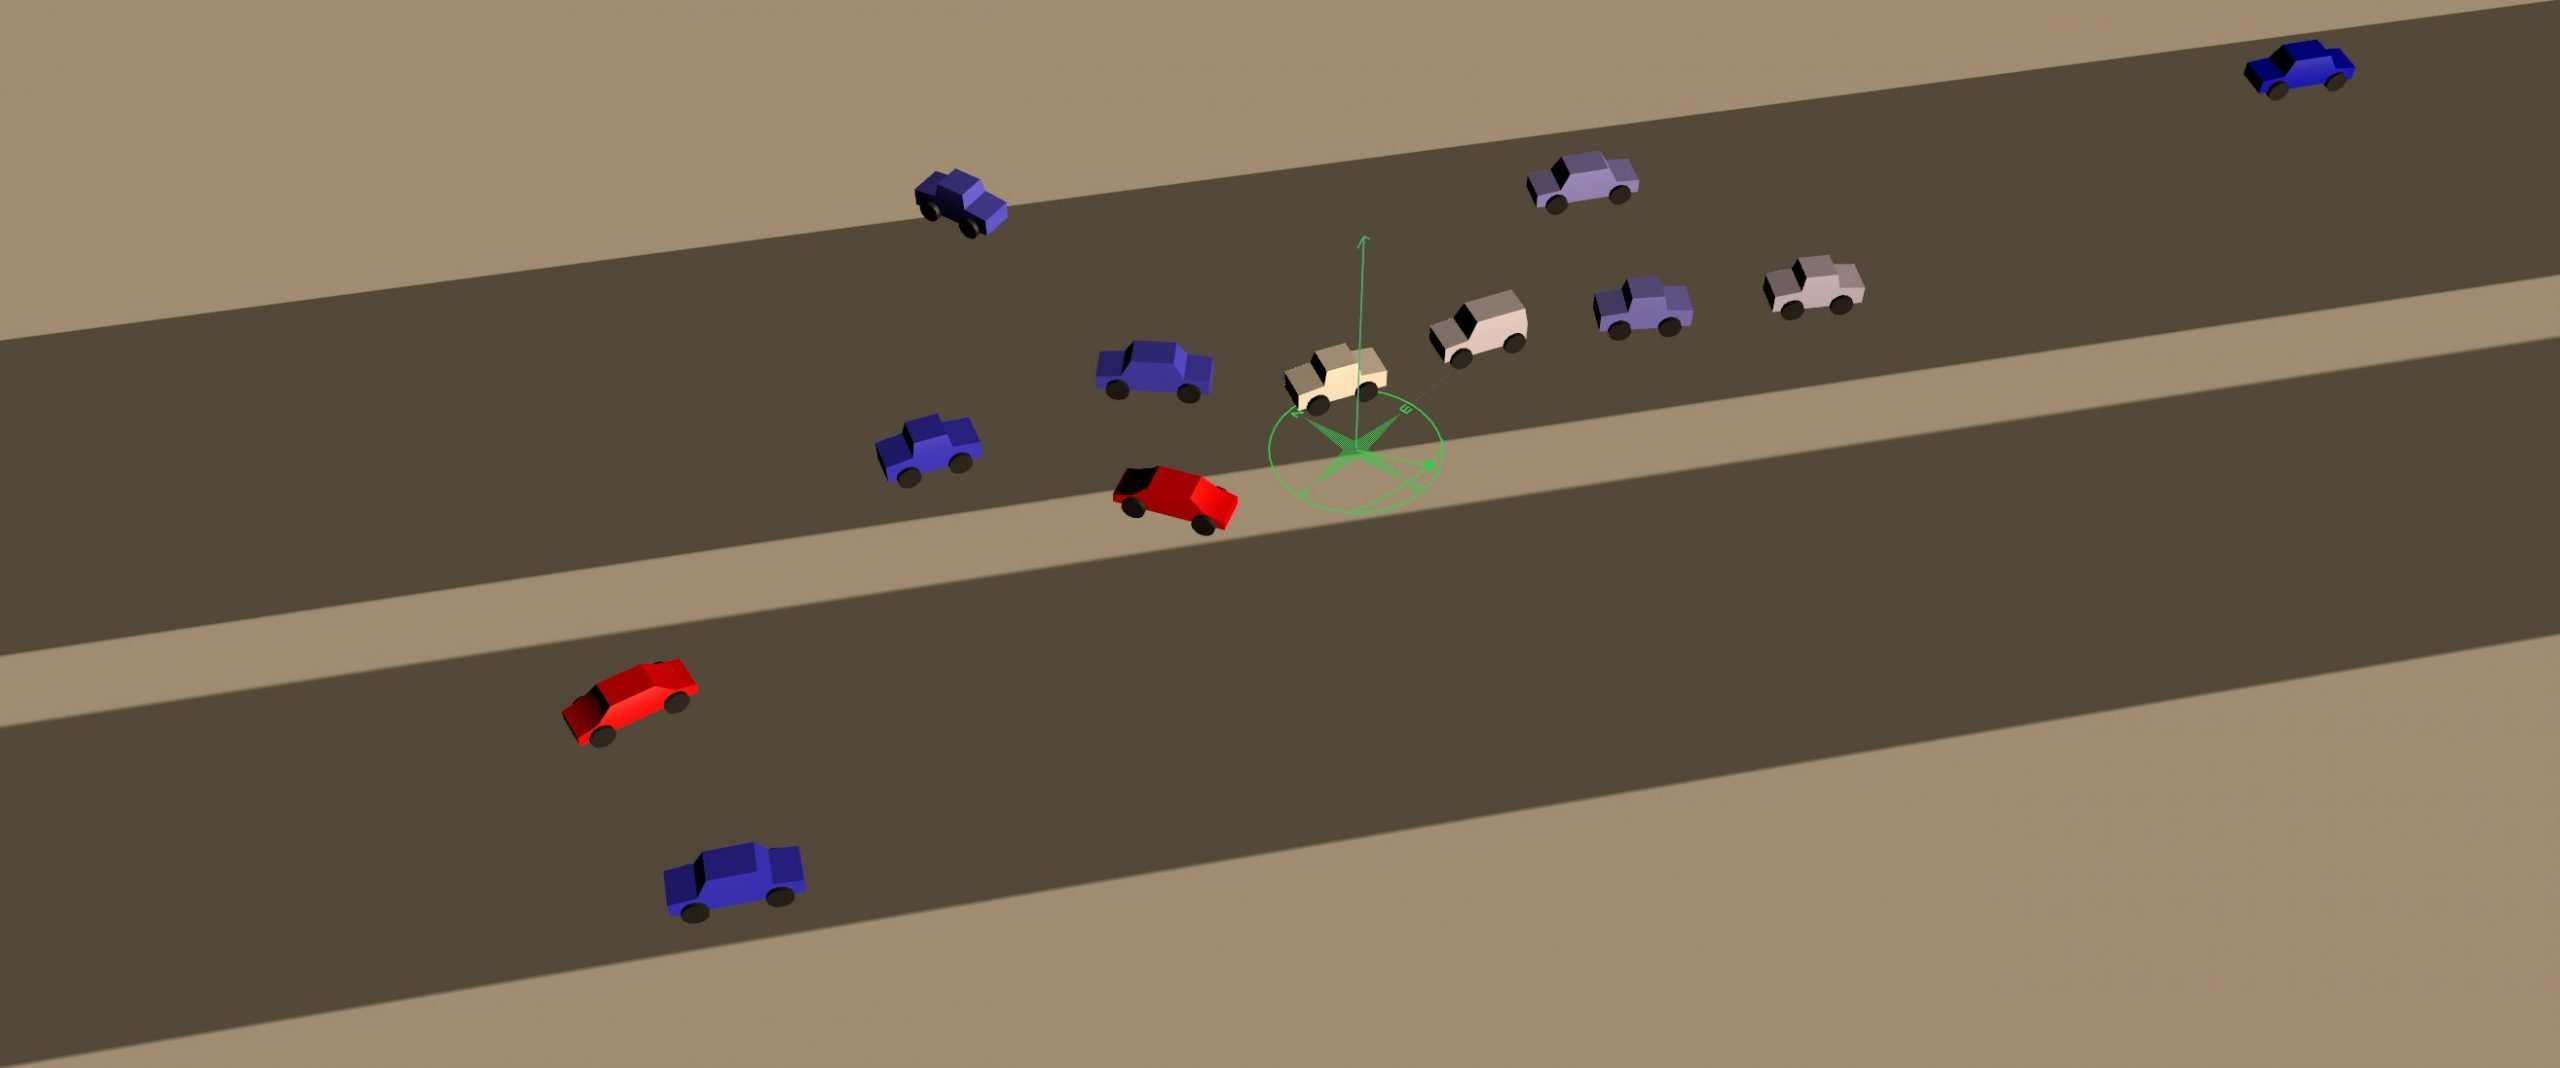
xpGeneratedObjectQuestion
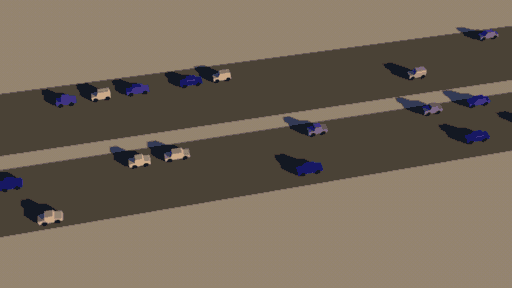
This scene is about the Geometry question ‘Generated Object’. You use this in combination with the Generator Object, and the question references the Generator Object children. The question determines whether or not a particle created the object and also which specific child (index number) of the Generator you are referring to.

Here the Generator is selecting randomly from it’s children which are types of car. There are four types of car and seven children. It just so happens that Car04, is a sports car…
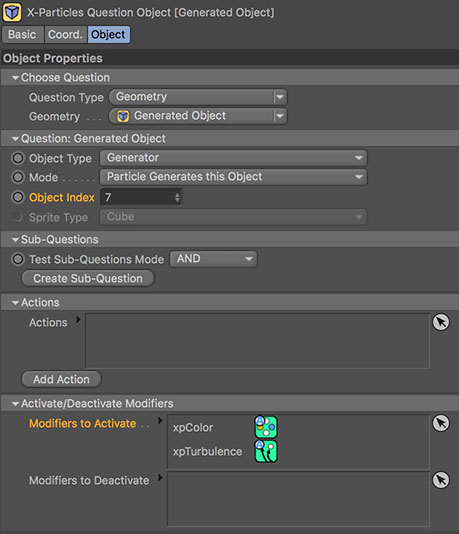
The Generated Object question checks if the car is index number 7, or in other words the 7th child. Then it triggers the Color Modifier, which turns the car red.
The question also enables the Turbulence Modifier. The turbulence is set to use only one axis, and this causes all the ‘sports cars’ to drive around erratically.
I also used some Particle Collision to stop the cars driving through each other. The collision is spherical, so not super accurate, but the scene is more about the question which is quite obscure, but has some nice potential, plus it also works with Sprites as well as objects.
xpEmitFromGenerator
Often when you emit some particles and create geometry, you want to emit more particles from the generated geometry. You could use a Connect object and then use this as the Object Source for the emitter. However, the Emitter itself has an option to connect objects, so you don’t need to use the Connect object at all.
Here we have Emitter 01 creating the particles which are used by the Generator to create the spheres. The second emitter is then emitting it’s particles from these spheres.
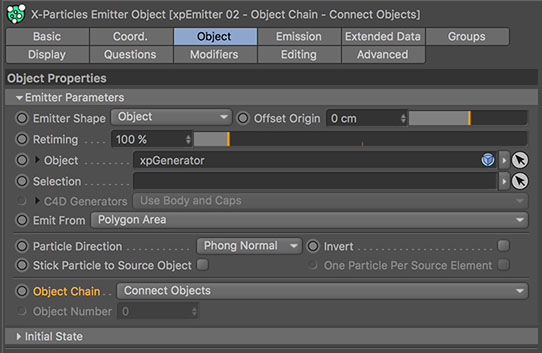
All you need to do is, set the Emitter Shape to Object. Drag the Generator into the Object field. Then, if you look a little further down the settings, change the Object Chain pop-up from Any Object to Connect Object. There are some other useful options in there too.
Now all your particle geometry will be used as emitters too.
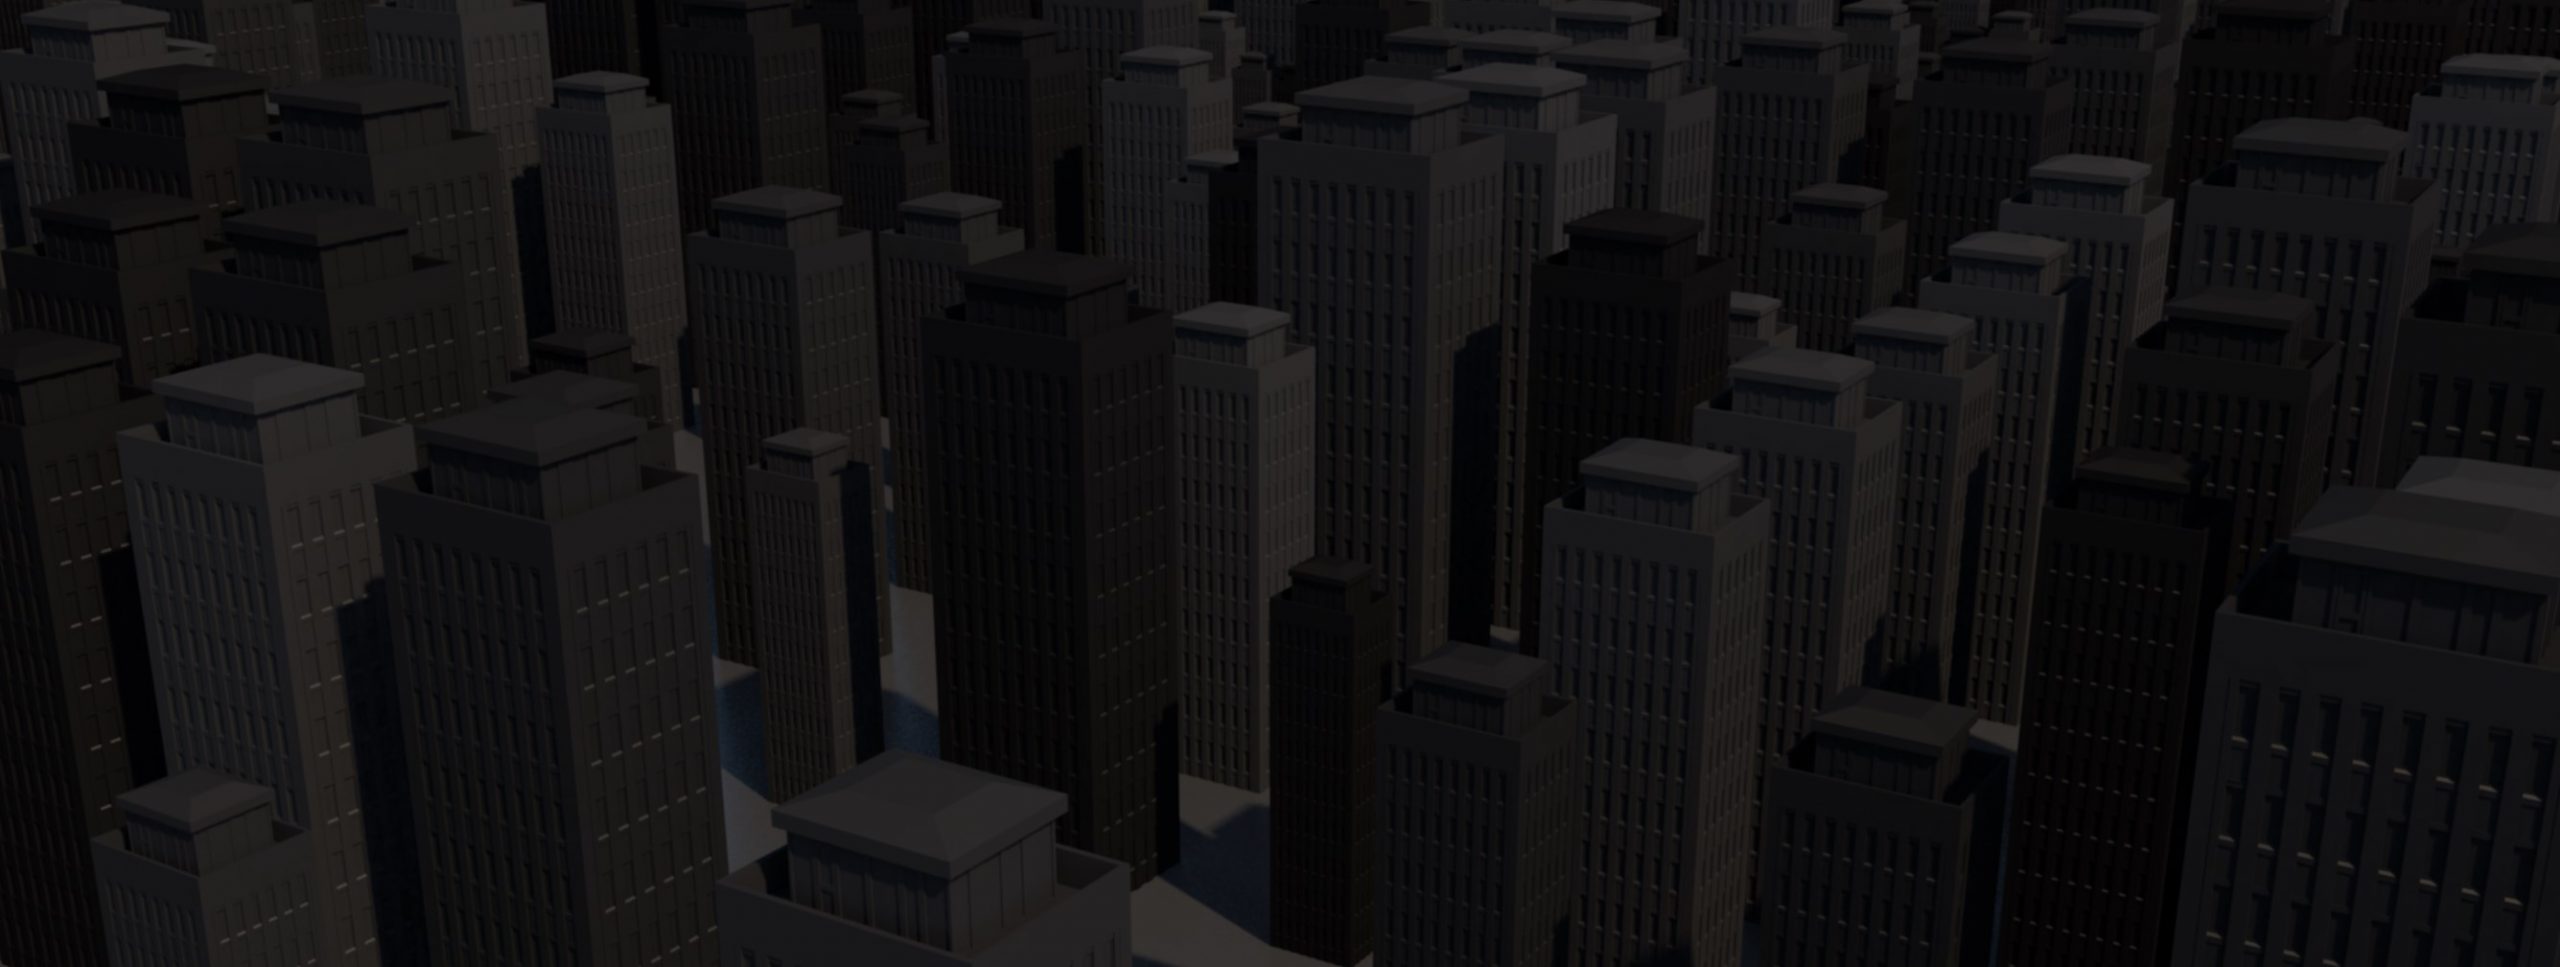
xpCity
This is a really simple example which uses X-Particles to distribute buildings across some geometry. When you open the file, jump to frame one to see the result, as there are no particles on frame zero. The Emitter creates the particles on the points of a plane object. The xpGenerator then generates the building geometry for each particle. I’ve only used one building, but you can of course use a collection of different buildings for a more varied result.
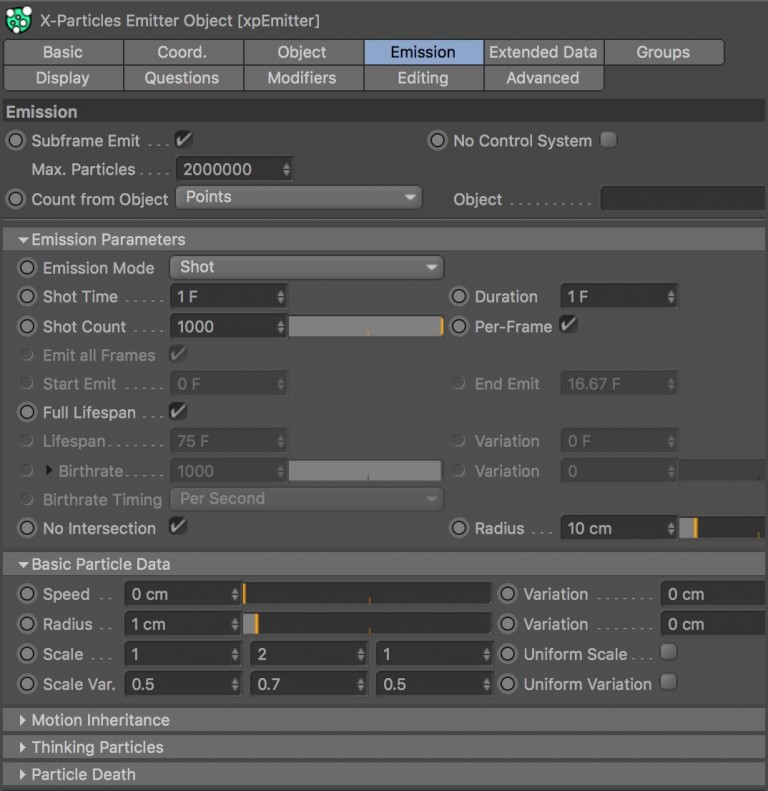
Under the emission tab on the Emitter, I’ve changed the Basic Particle Data so that we have some non uniform scale variation. In the display tab of the emitter, I’ve changed the Color Mode so that the colour is randomly selected from a gradient. By using the MoGraph colour shader on the geometry, we can pass this colour into our material channels.
xpDoubleHelix
Here is one way of setting up a double helix animation using X-Particles. Two particles are emitted from a polygon selection and then xpVortex is used to create the spiral motion. As the two particles spiral along, the xpTendril Modifier, creates more particles which follow behind. You can adjust the interval to place the particles closer together or further apart.
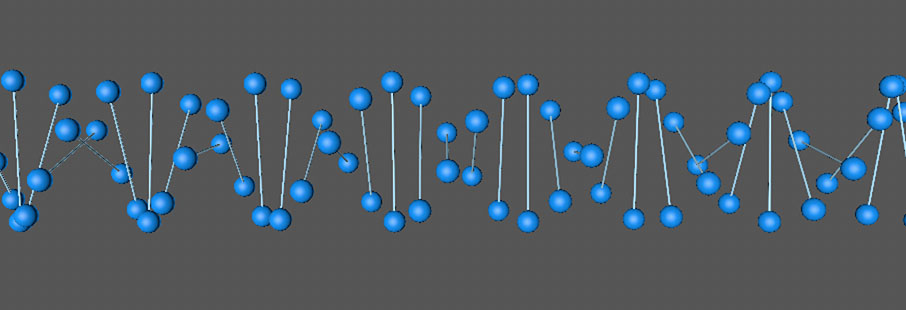
The particles are rendered as spheres using the xpSprite object which is a very efficient method for rendering simple geometry (as well as other spritey type things). The ‘rungs’ of the ladder are created using the xpTrail object, this is set to use the Segmented Sequence Algorithm. By using a segment and gap length of one frame, we create a trail between every two particles. This is then rendered in a Sweep object, but could easily be rendered with the XP material if you want something more efficient.

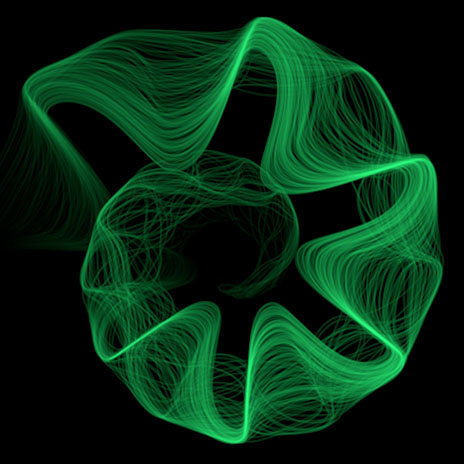
xpFollowPath_Cloner
This scene doesn’t have any particularly practical uses, but it does show a nice feature of the xpFollowPath modifier. The idea behind this modifier is that you create a path from a collection of spline objects and then drag these into the Path Objects field. The particles affected by this modifier will use these splines as a virtual path and will travel through them one after another. The Acuteness of Turn parameter will control how sharply the particle will head for the next object.
In this scene, we have a Cloner which is cloning a bunch of splines along a helix spline. These clones are then affected by the Step Effector to scale them down sequentially, and the Formula Effector, which introduces some undulating animation to the scale and position of the clones.
The nice thing about the xpFollowPath modifier is that it will also accept splines which are generated by a cloner object. This gives us the option to use a completely parametric approach for generating and animating the splines used for the path.
In XP4 there are even more options for this kind of setup. If you’re new to XP, then take a look at Spline Flow modifier for another way to create these type of effects where you can guide the particles exactly where you want them to be by using a spline.

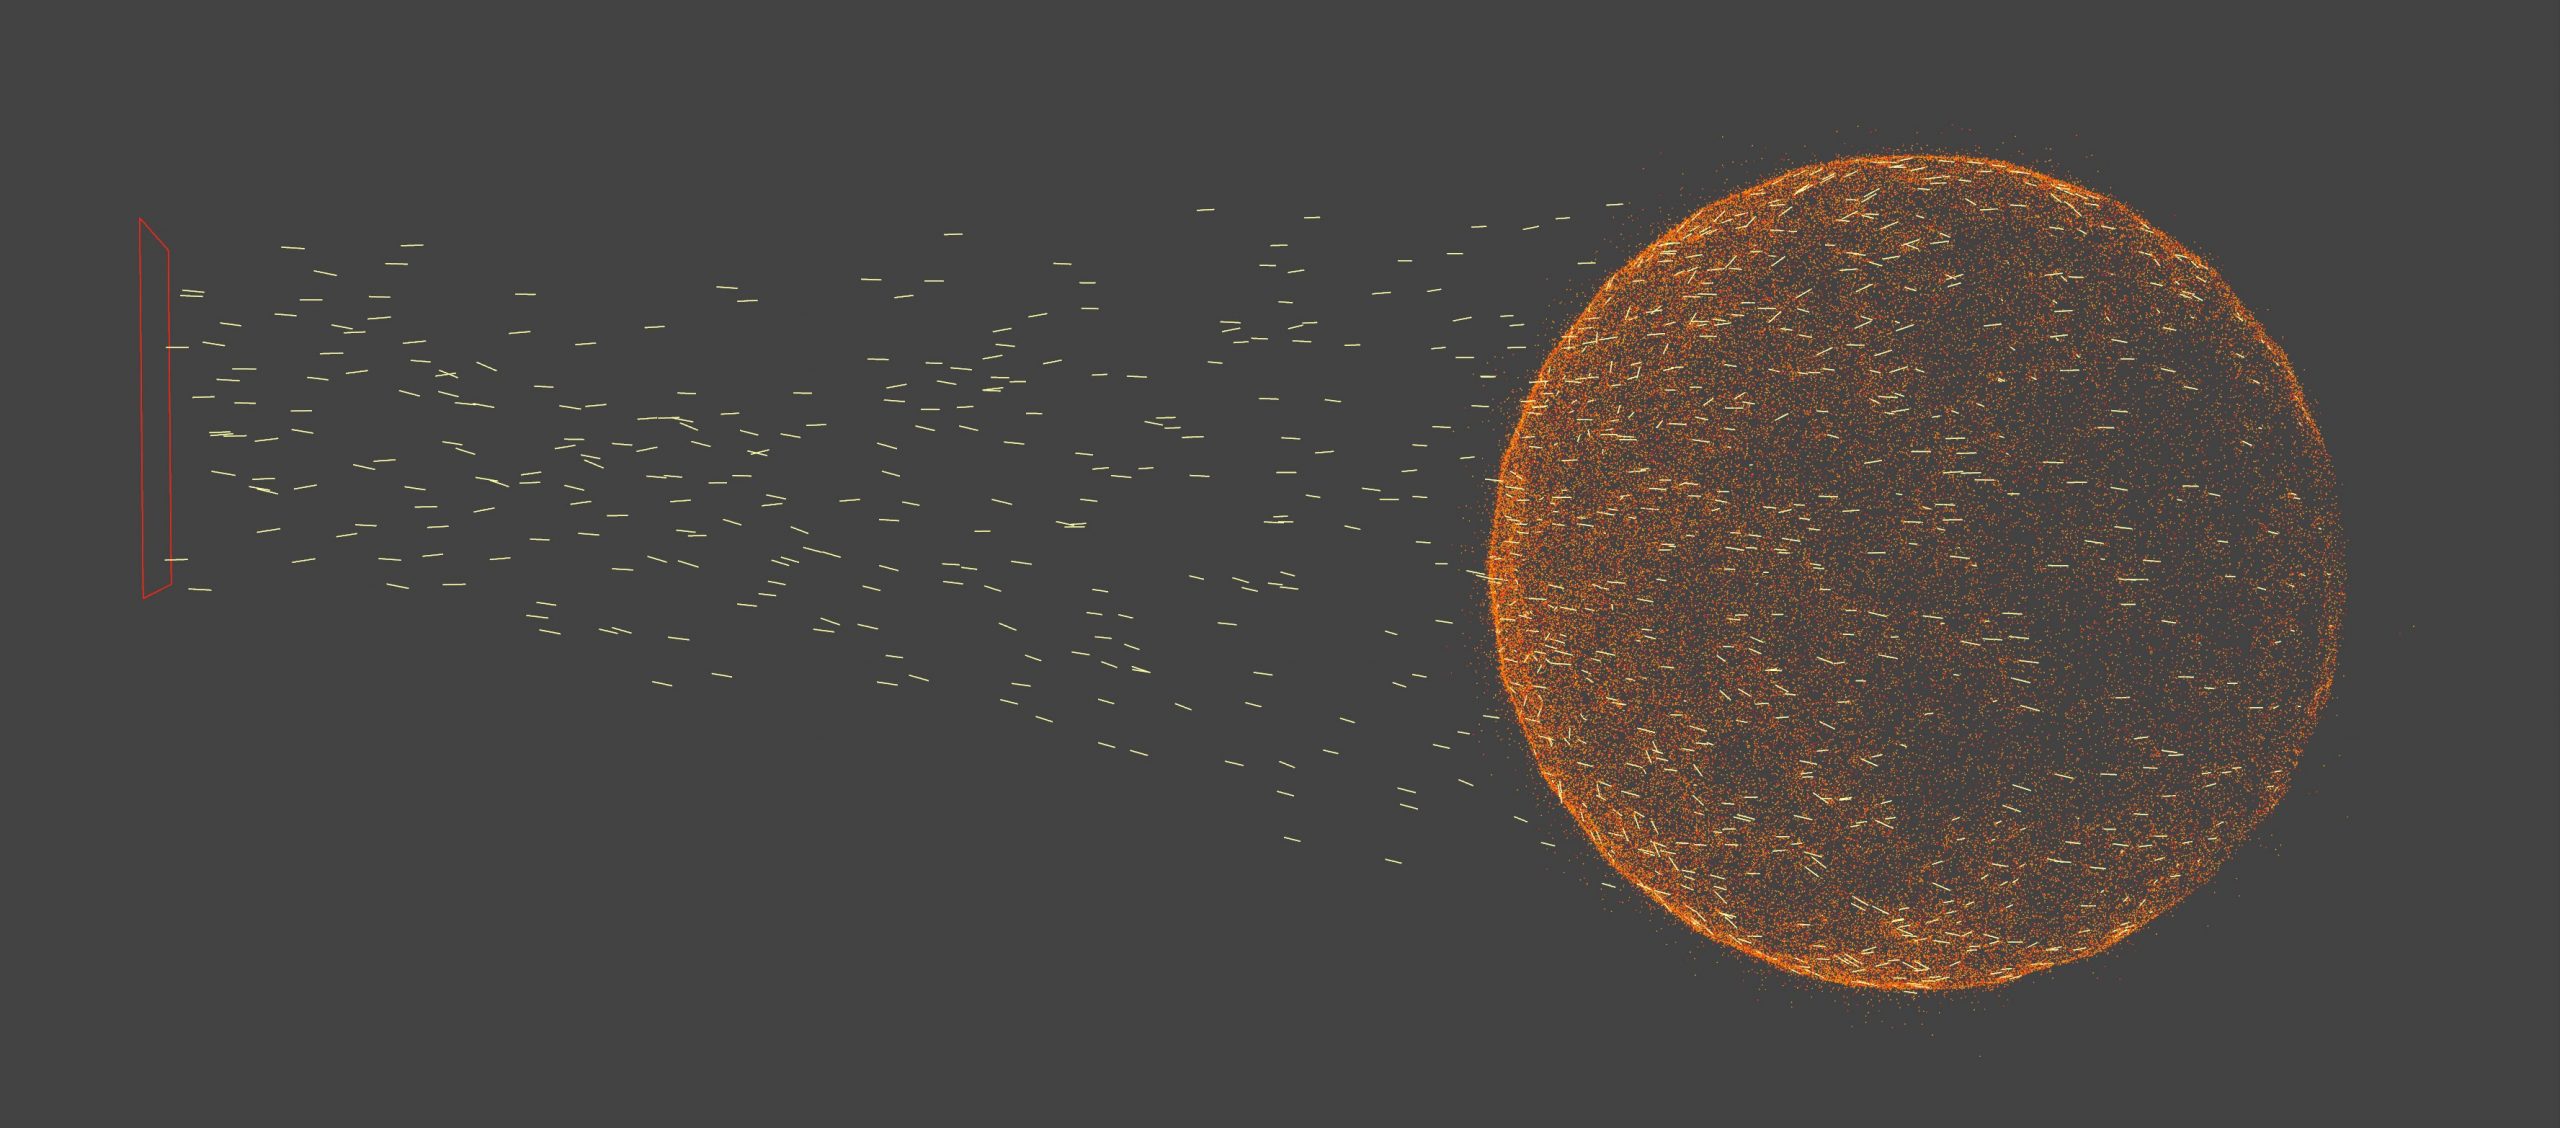
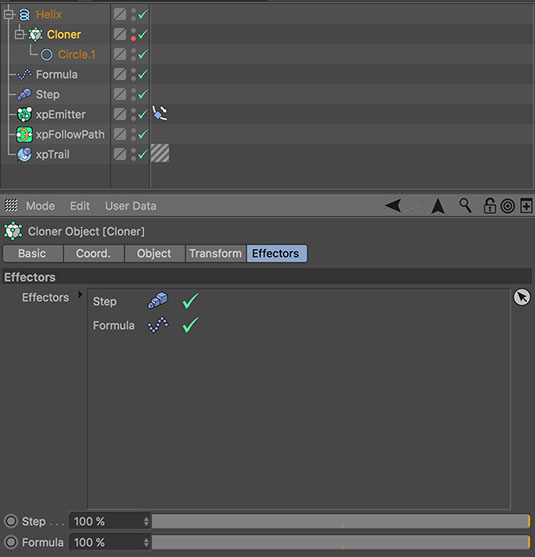
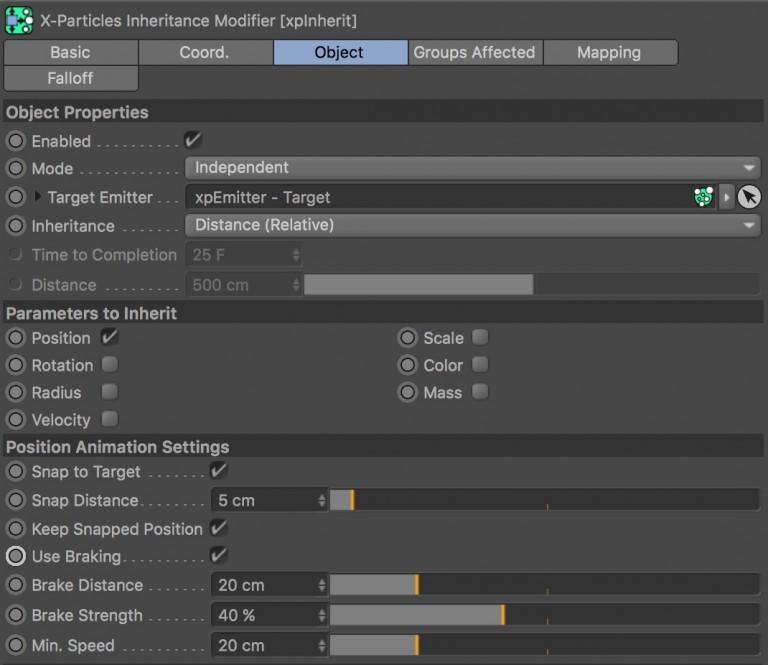
xpInherit
The xpInherit Modifier is similar to the MoGraph Inheritance Effector. It allows you to take data from certain parameters of one particle emitter and pass them to another emitter. As you can see in the screenshot of the Object Manager, we have two emitters in the scene. The target emitter takes the skull object and emits particles across the surface of the polygons. As these particles have no speed, they sit on the surface.
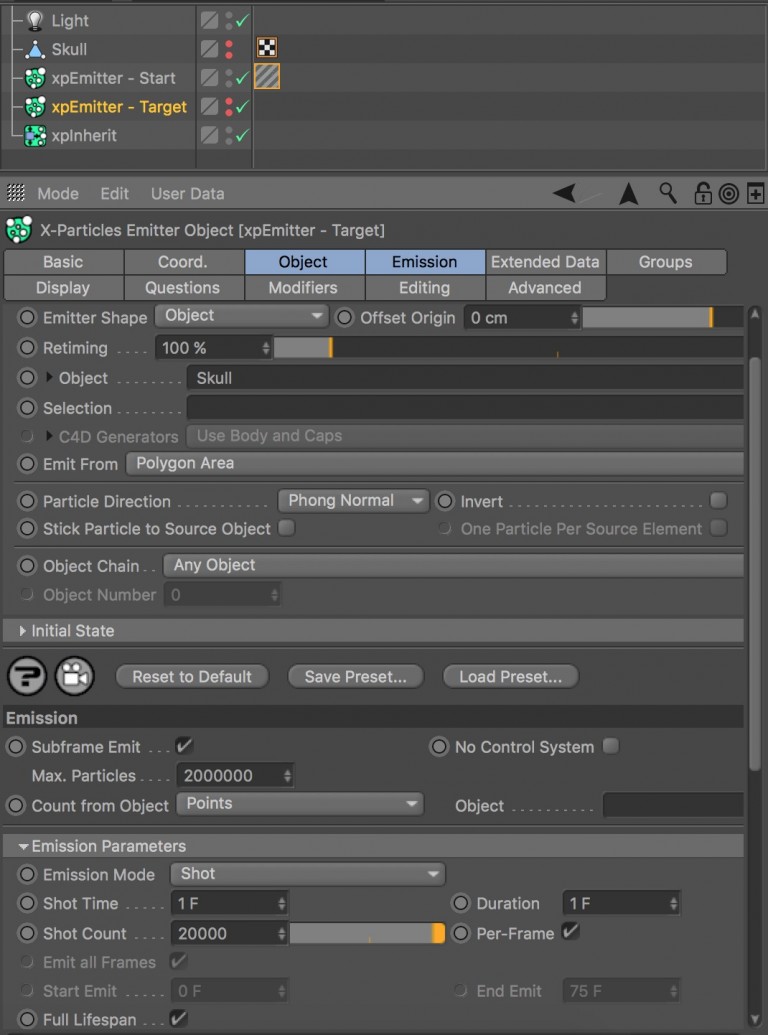
The xpInherit modifier is used to inherit the position values from the target emitter and pass these to the other (start) emitter. The result is that the particles from the start emitter move across the scene and land on the target particles. There is an option to use braking and this allows you to create a nice ease as the particles land in place.
I rendered this example using the XP Material with Volumetric Voxels. This gives the particles a pixel type motion as they animate across the voxel grid.

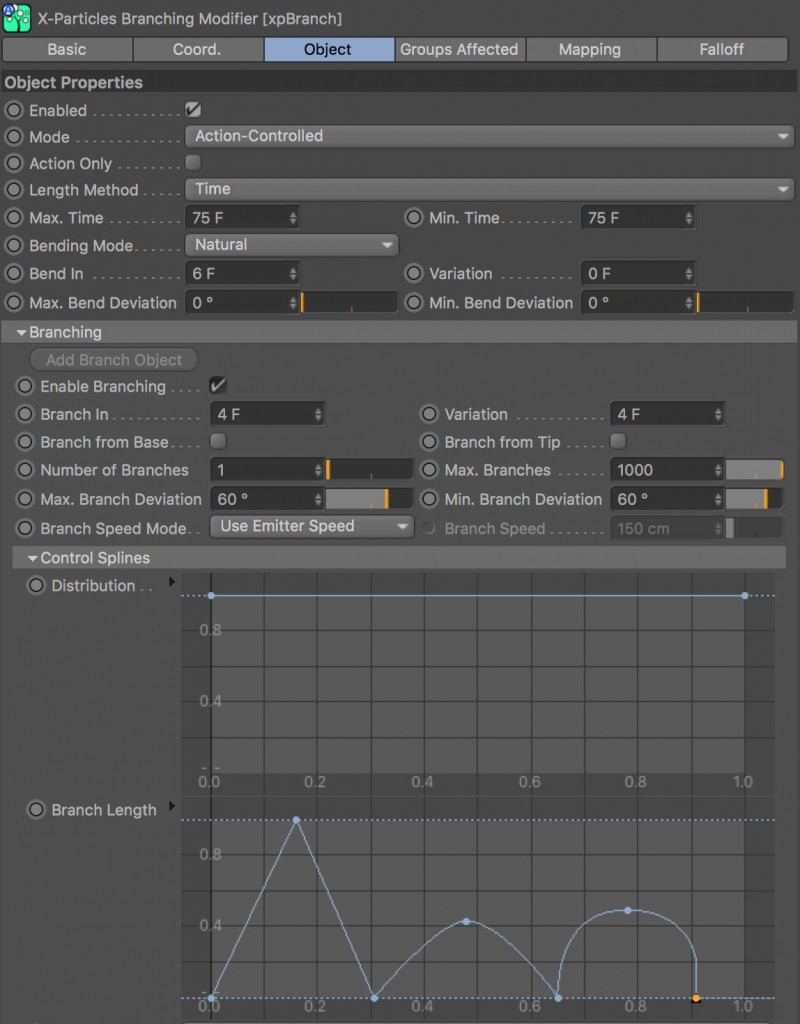
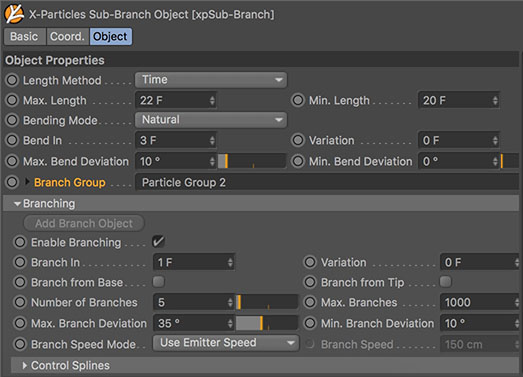
xpBranch_Palm
Using the xpBranch modifier, this scene shows you how you can create a palm tree like structure. First of all we emit one particle straight up. The emitter has a question to see if the particle age is greater than 0, this is used to enable the Branch modifier. The reason I’ve done this is because the Branch Modifier is Action controlled. We also have the Action Only checkbox enabled on the xpBranch modifier. By using this checkbox, we can use an Action to force branching on a specific frame.
Once the particle is aged greater than 50, the Branching Modifier Action is enabled which forces the xpBranch object to produce a bunch of branches on that frame. I also wanted to create a second level of smaller branches, so on the next frame, the Action Only checkbox on the xpBranch object is animated to the disabled state.

One nice feature is that we can assign each sub-branch to it’s own group. This is useful, as it allows us to restrict the Gravity Modifier to the main branches and not affect the trunk, (which is essentially a branch), or the smaller secondary branches.
xpFollowSplineTurbulent
In this scene, we have a helix spline which is slowly rotating. The X-Particles emitter is at the base of the spline and it is pointing up. The xpFollowSpline Modifier forces our particles to follow the chosen spline.
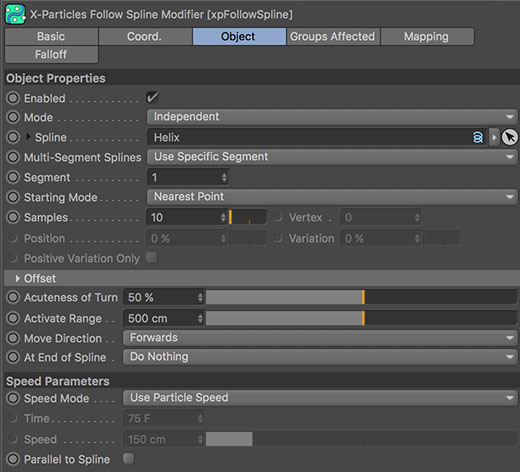
I’ve added in some turbulence which has falloff along the Y axis. As the particles move towards the top of the spline, the turbulence starts to mix in with the follow spline behaviour which creates a nice fluid motion, and the particles still try to adhere to the spline. The addition of the xpTrail object creates some small splines which are traced from the movement of the particles. This creates a whispy effect that could be used for creating stylised smoke.


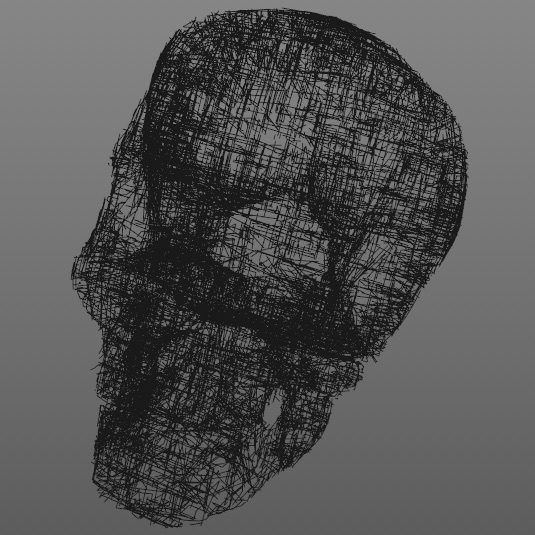
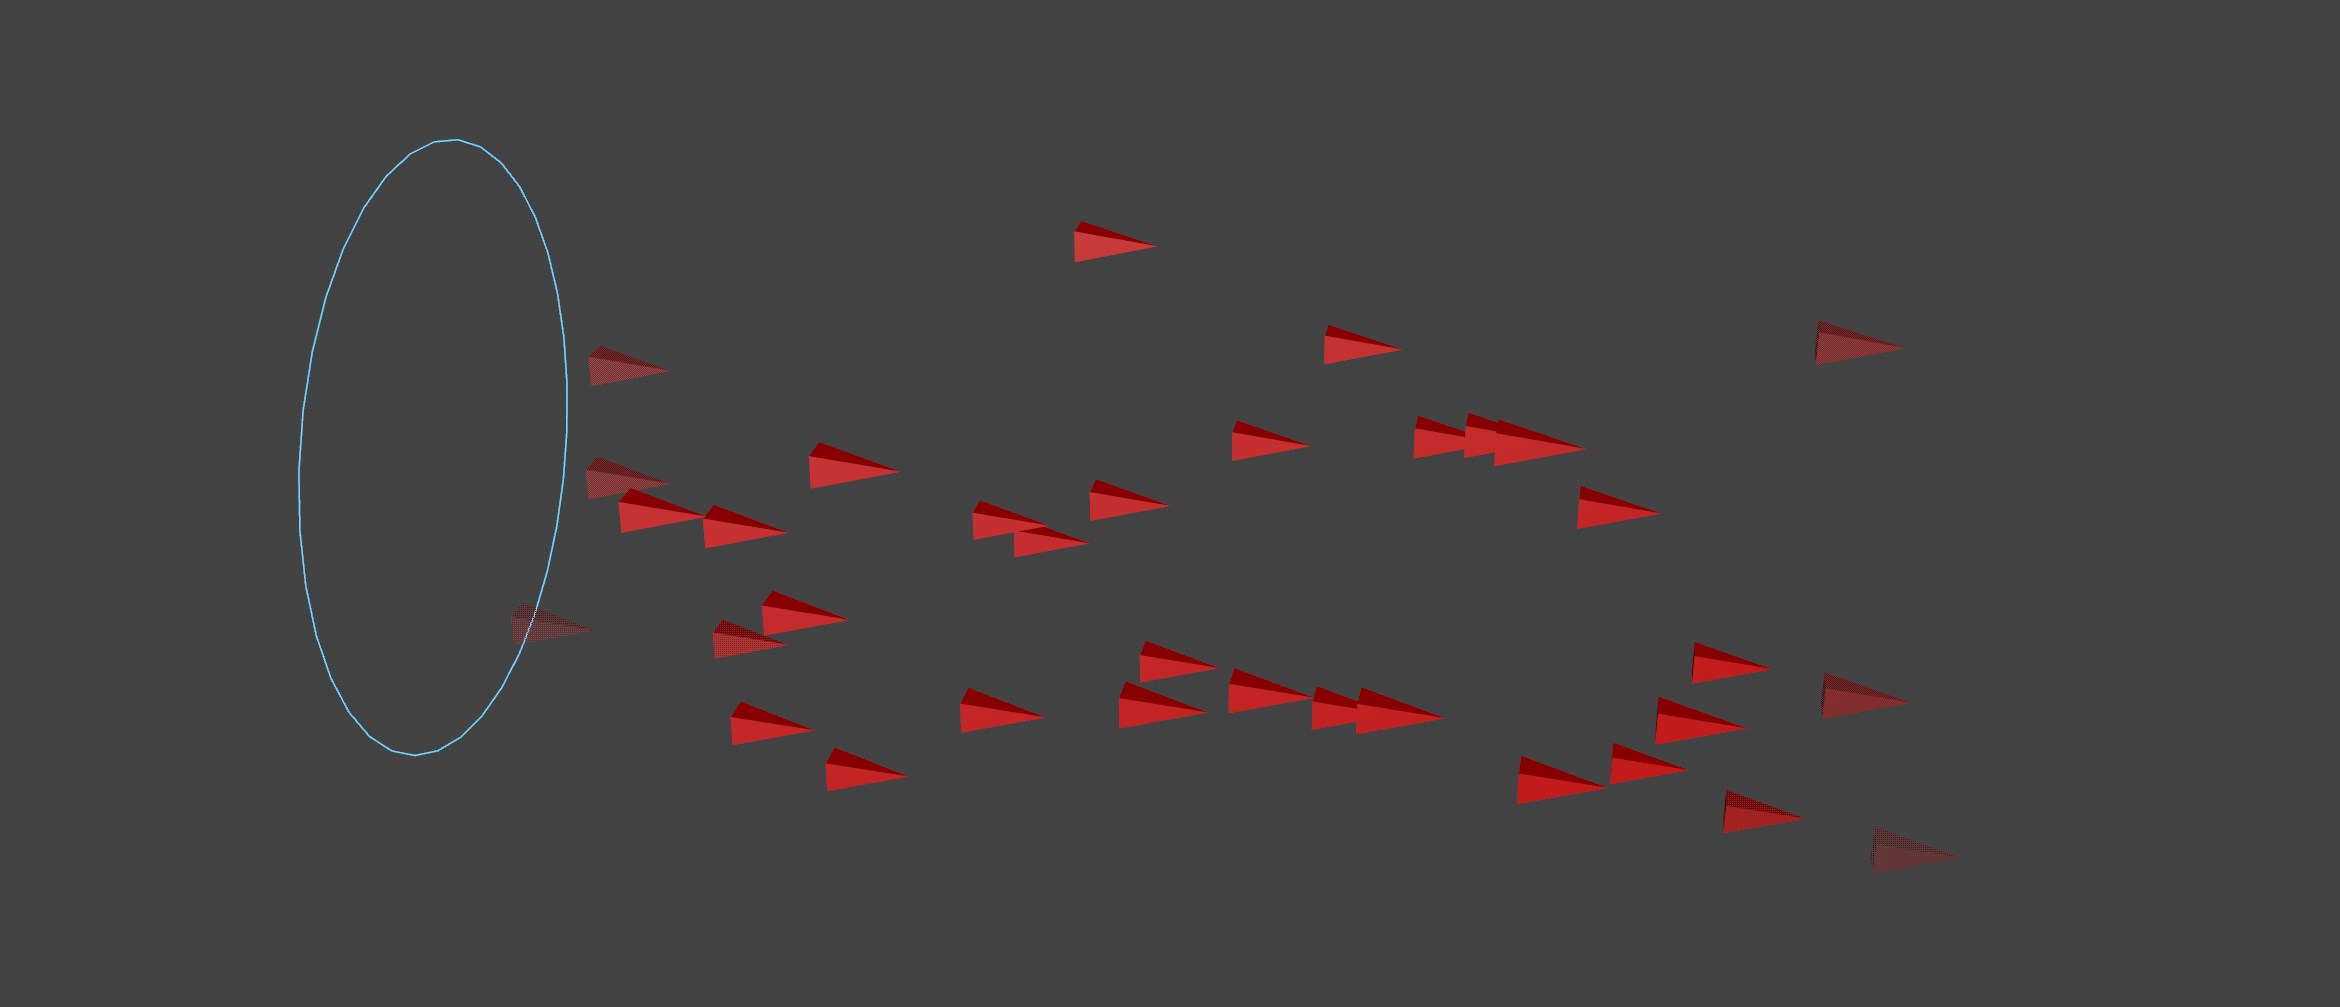
xpNetworkSkull
This is a really simple, yet effective setup. Basically, you emit particles from the inside of an object and use the same object for collision, the result is that the particles get stuck bouncing around inside. Kaboing!
The xpNetwork also comes into play as this has the option to generate the networking pattern inside a volume. The particles are traced, and the resulting splines are rendered using the hair shader. This gives a shiny volumetric feel to the xpTrail object.
xpFadeInAndOut
This setup shows you how to fade particle geometry in and out using a combination of the xpColor modifier and the Cinema 4D MoGraph Color Shader. First I emit some particles, set them to black and check the age with a question. If the particle is >0 then the xpColor – FadeIn modifier is activated.
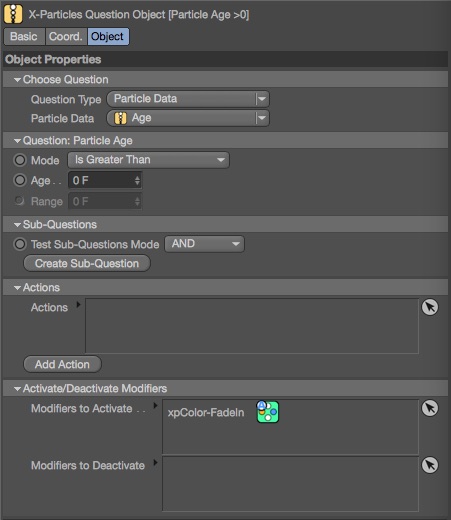
The xpColor Mod changes the particle colour from black to white. Note that on the xpColor Mod, the operation is Time-Dependent and the completion time is 25 frames (from black to white). Another option might be to use the Age-Dependent operation, then you use a percentage of the particle life (where the gradient represents the birth to death of the particle), rather than a fixed frame length.
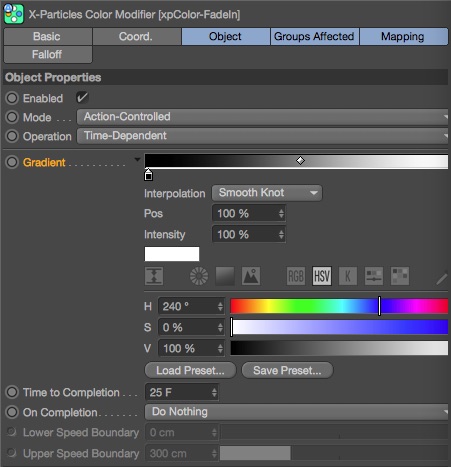
The particle colour is then read by the MG Color Shader, which is placed in the Alpha Channel of the material. This causes the particles to fade on over 25 frames. The procedure is then reversed, starting with another question which checks the age >75, and then activates the other xpColor Modifier. The second xpColor Mod is set to change the particle colour from white through to black and this fades the particles off.
To create this effect using Redshift, you could use the Color User Data node and Particle Color Attribute.

xpParticleFalloff
This setup is almost exactly the same as the example using xpNoiseFalloff. The difference is that in this scene we have an emitter firing particles through the clones and also, the Plain Effector is then set to use xpParticleFalloff. In the R23 version of this file, the set up uses the xpParticleFalloff Field.
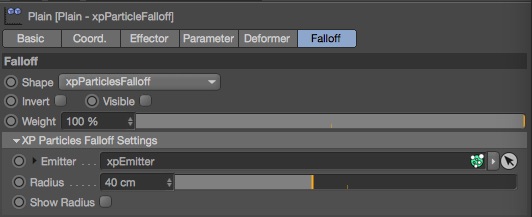
The xpParticleFalloff gives you the option to drag any xpEmitter into the field and then the particles are used as the falloff source, this is similar to dragging a point object into the falloff list, but works with your XP Particles System.

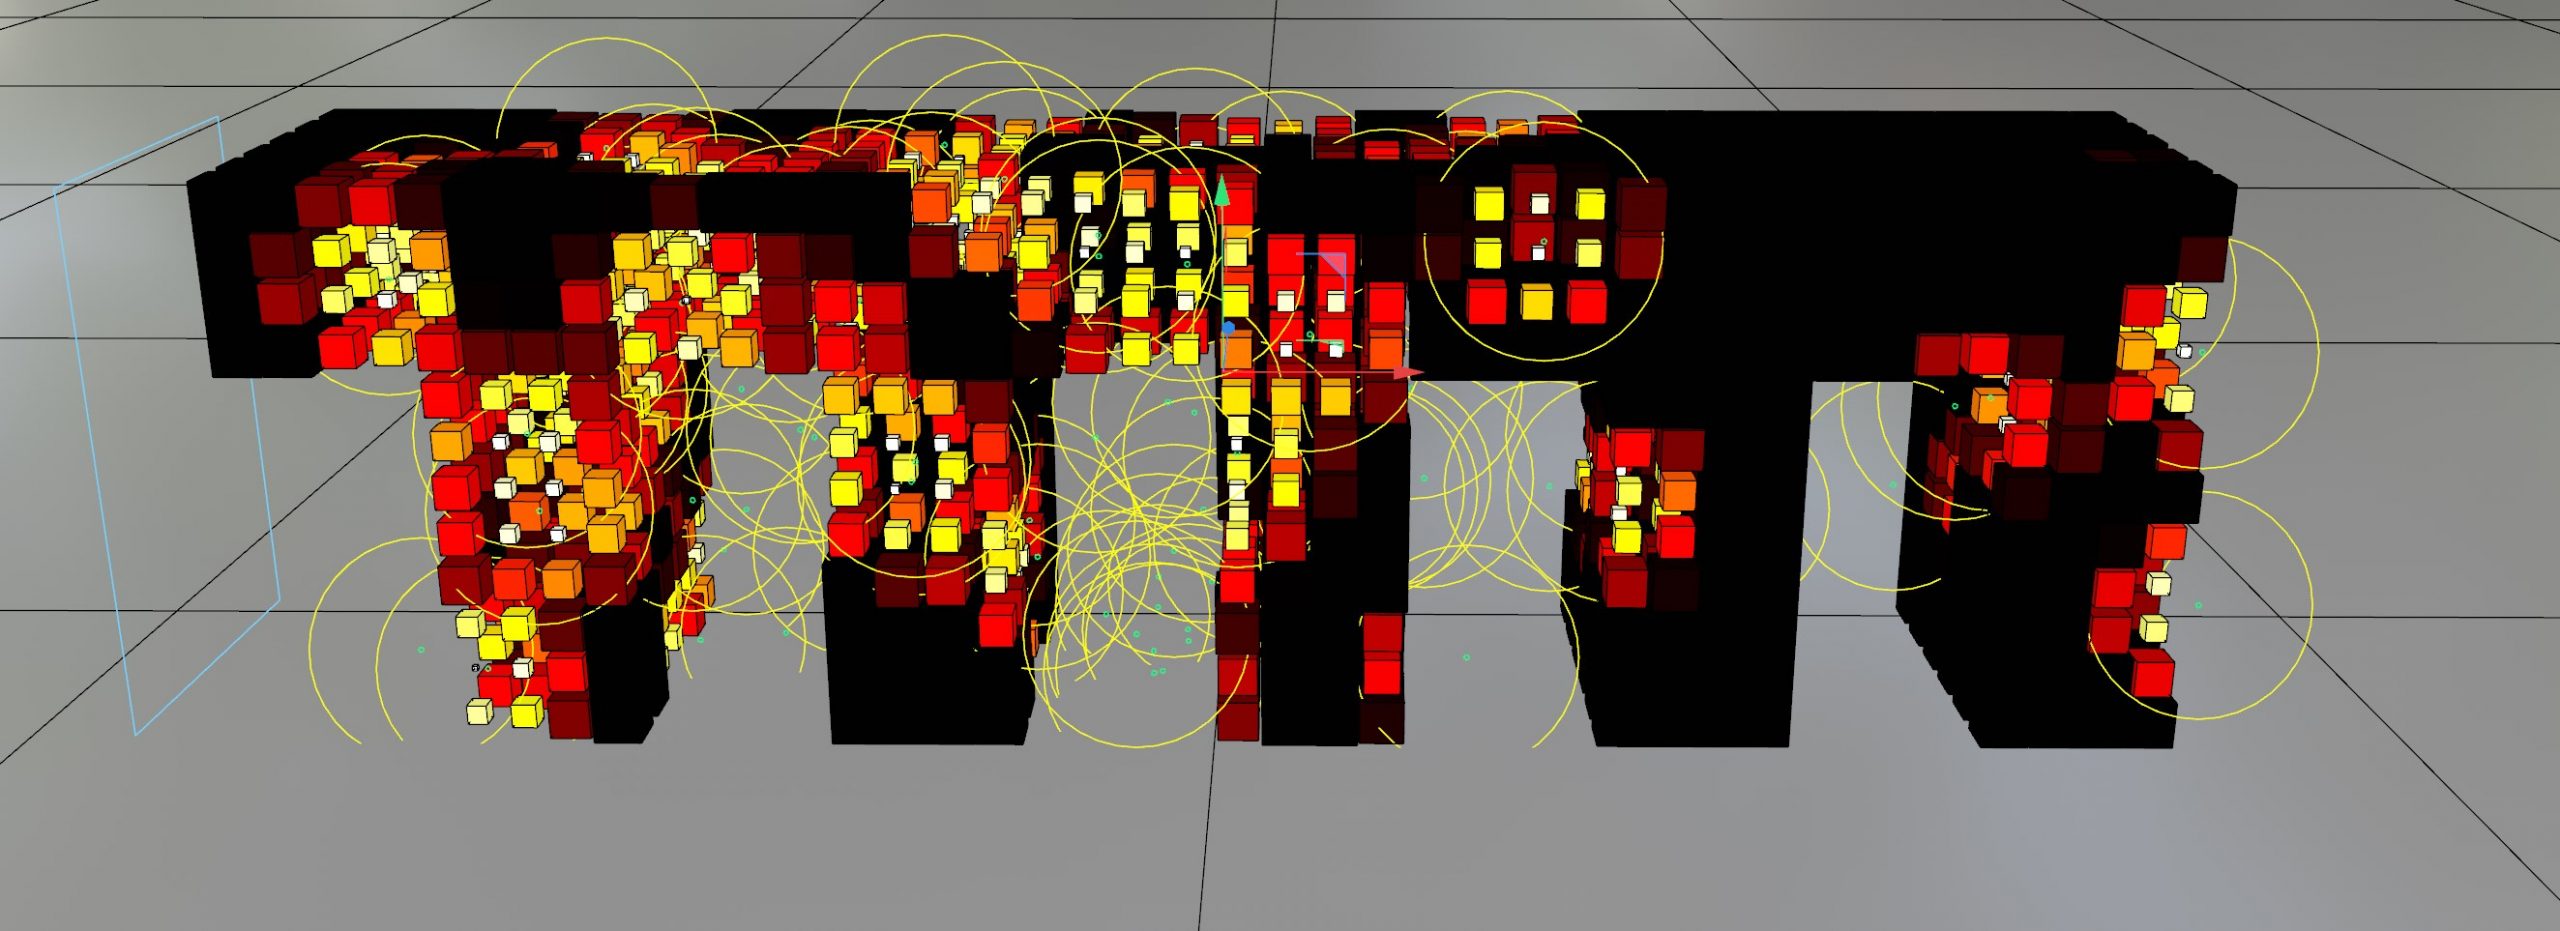
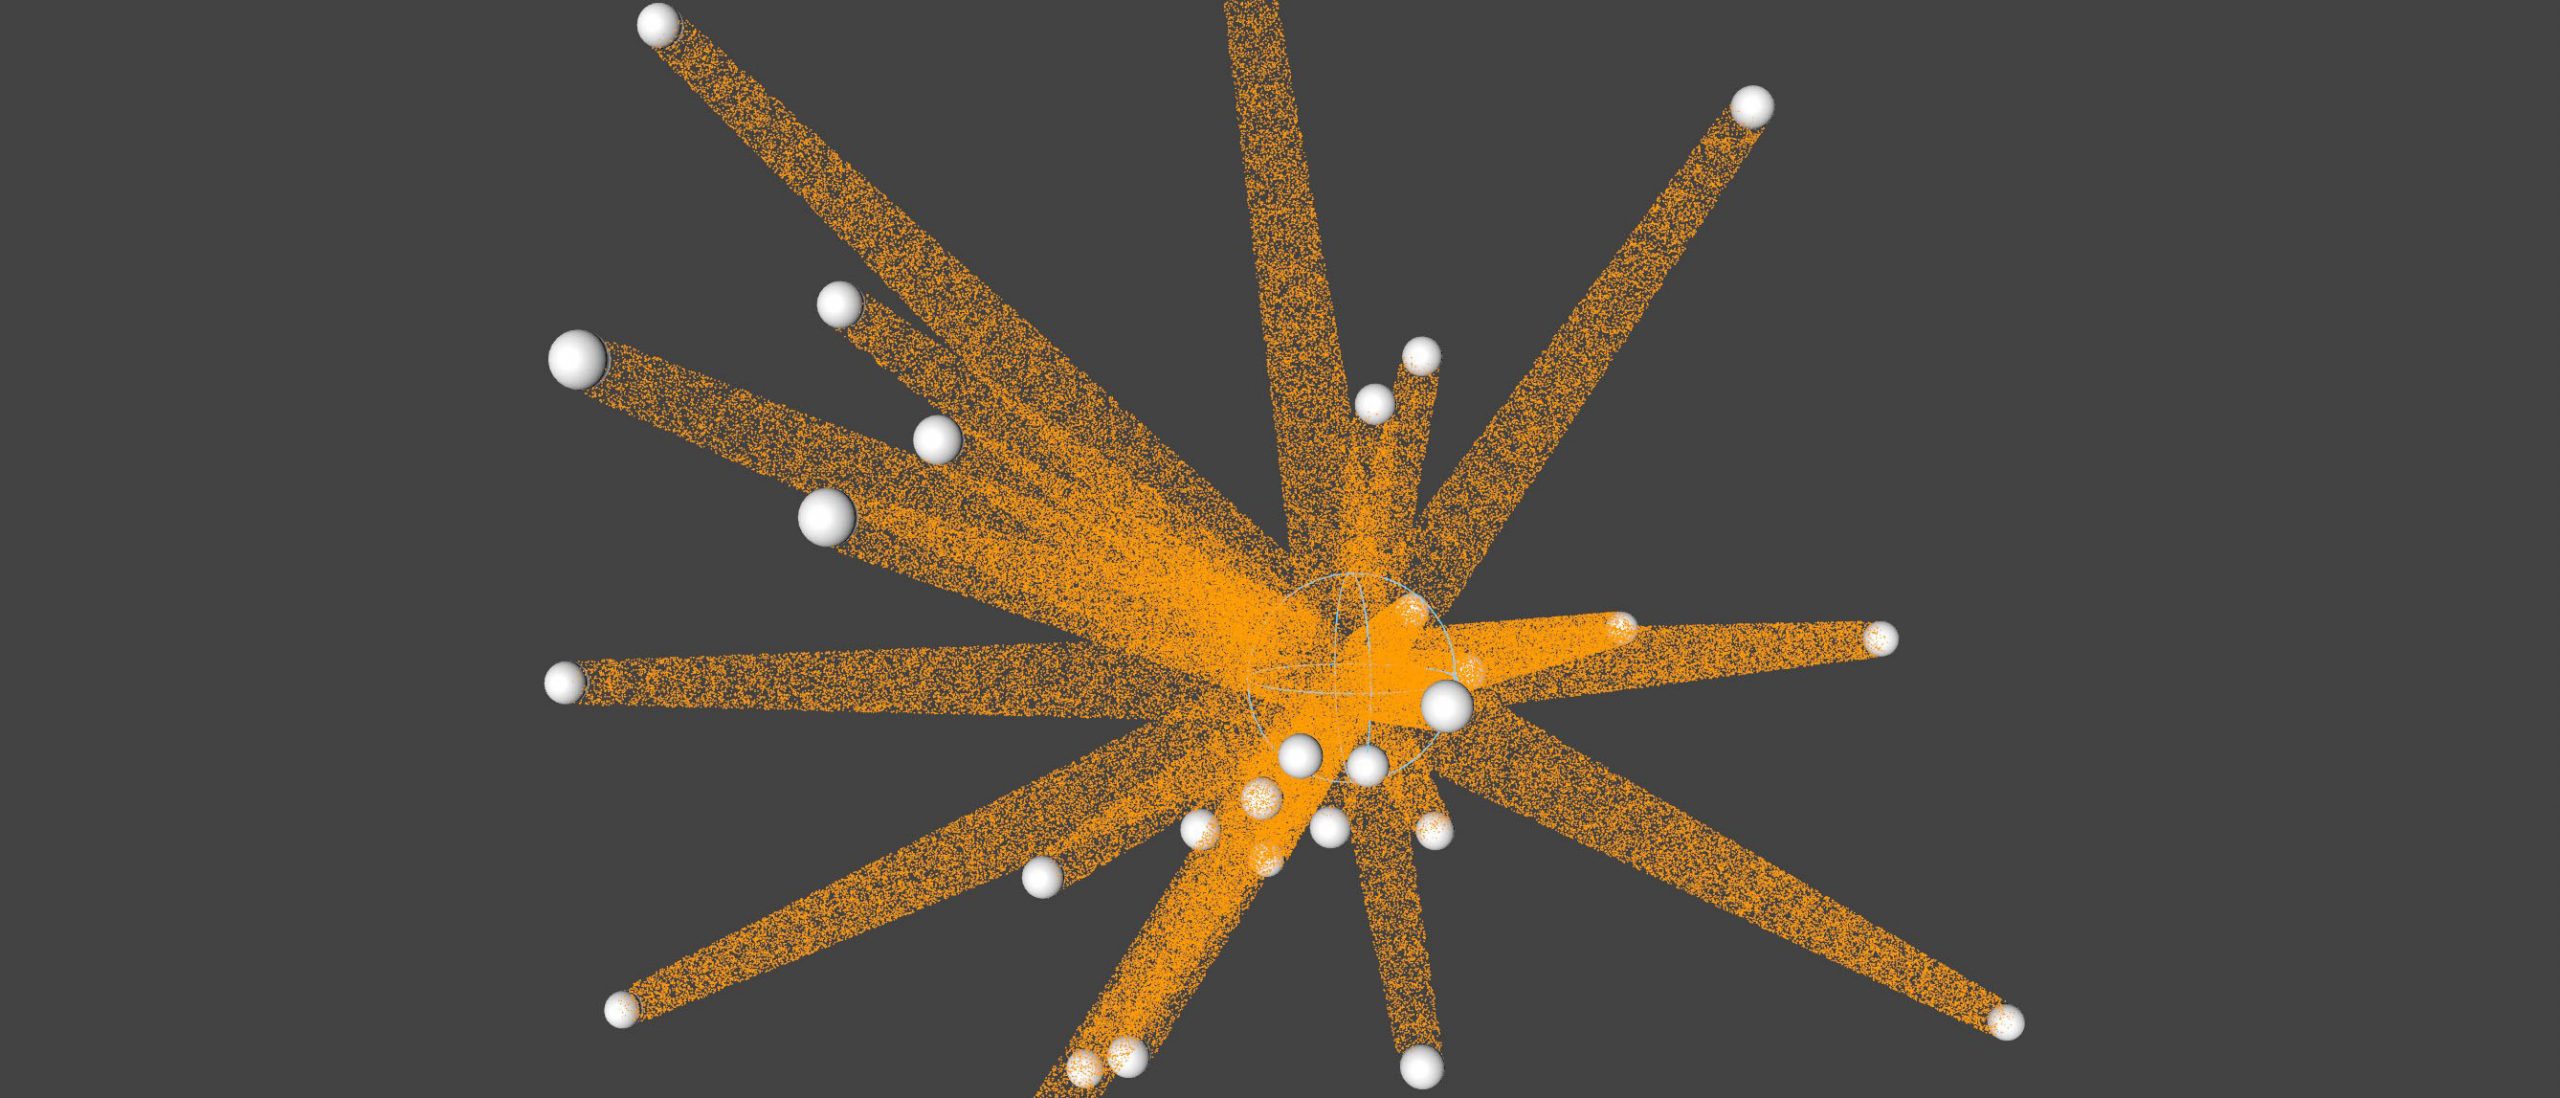
xpDistanceConstraints
The example uses the xpConstraint Object to create connections based on the particle distance. First I emit some particles on a spline, then the xpConstraint object connects these particles. We have some gravity in the scene which causes the particles to fall and collide with the Landscape Object (which has an xpCollider Tag).
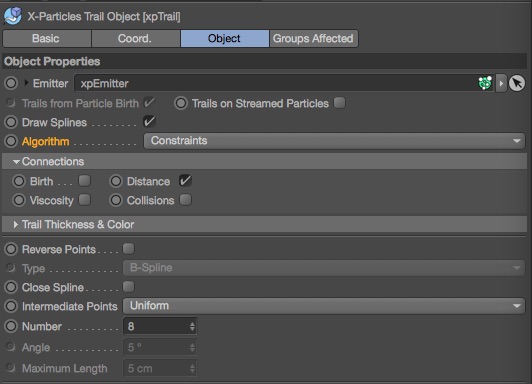
The constraints are created based on the number of connections allowed and the distance between the particles. The connected particles are used by the xpTrail object to generate splines, this is possible by choosing the Constraints Algorithm, which draws a spline where there is a constraint.
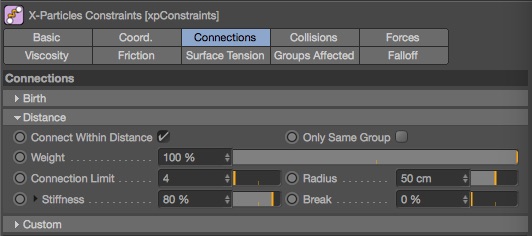
In the image below, I have increased the number of connections and distance in the xpConstraint object which creates this web like structure.

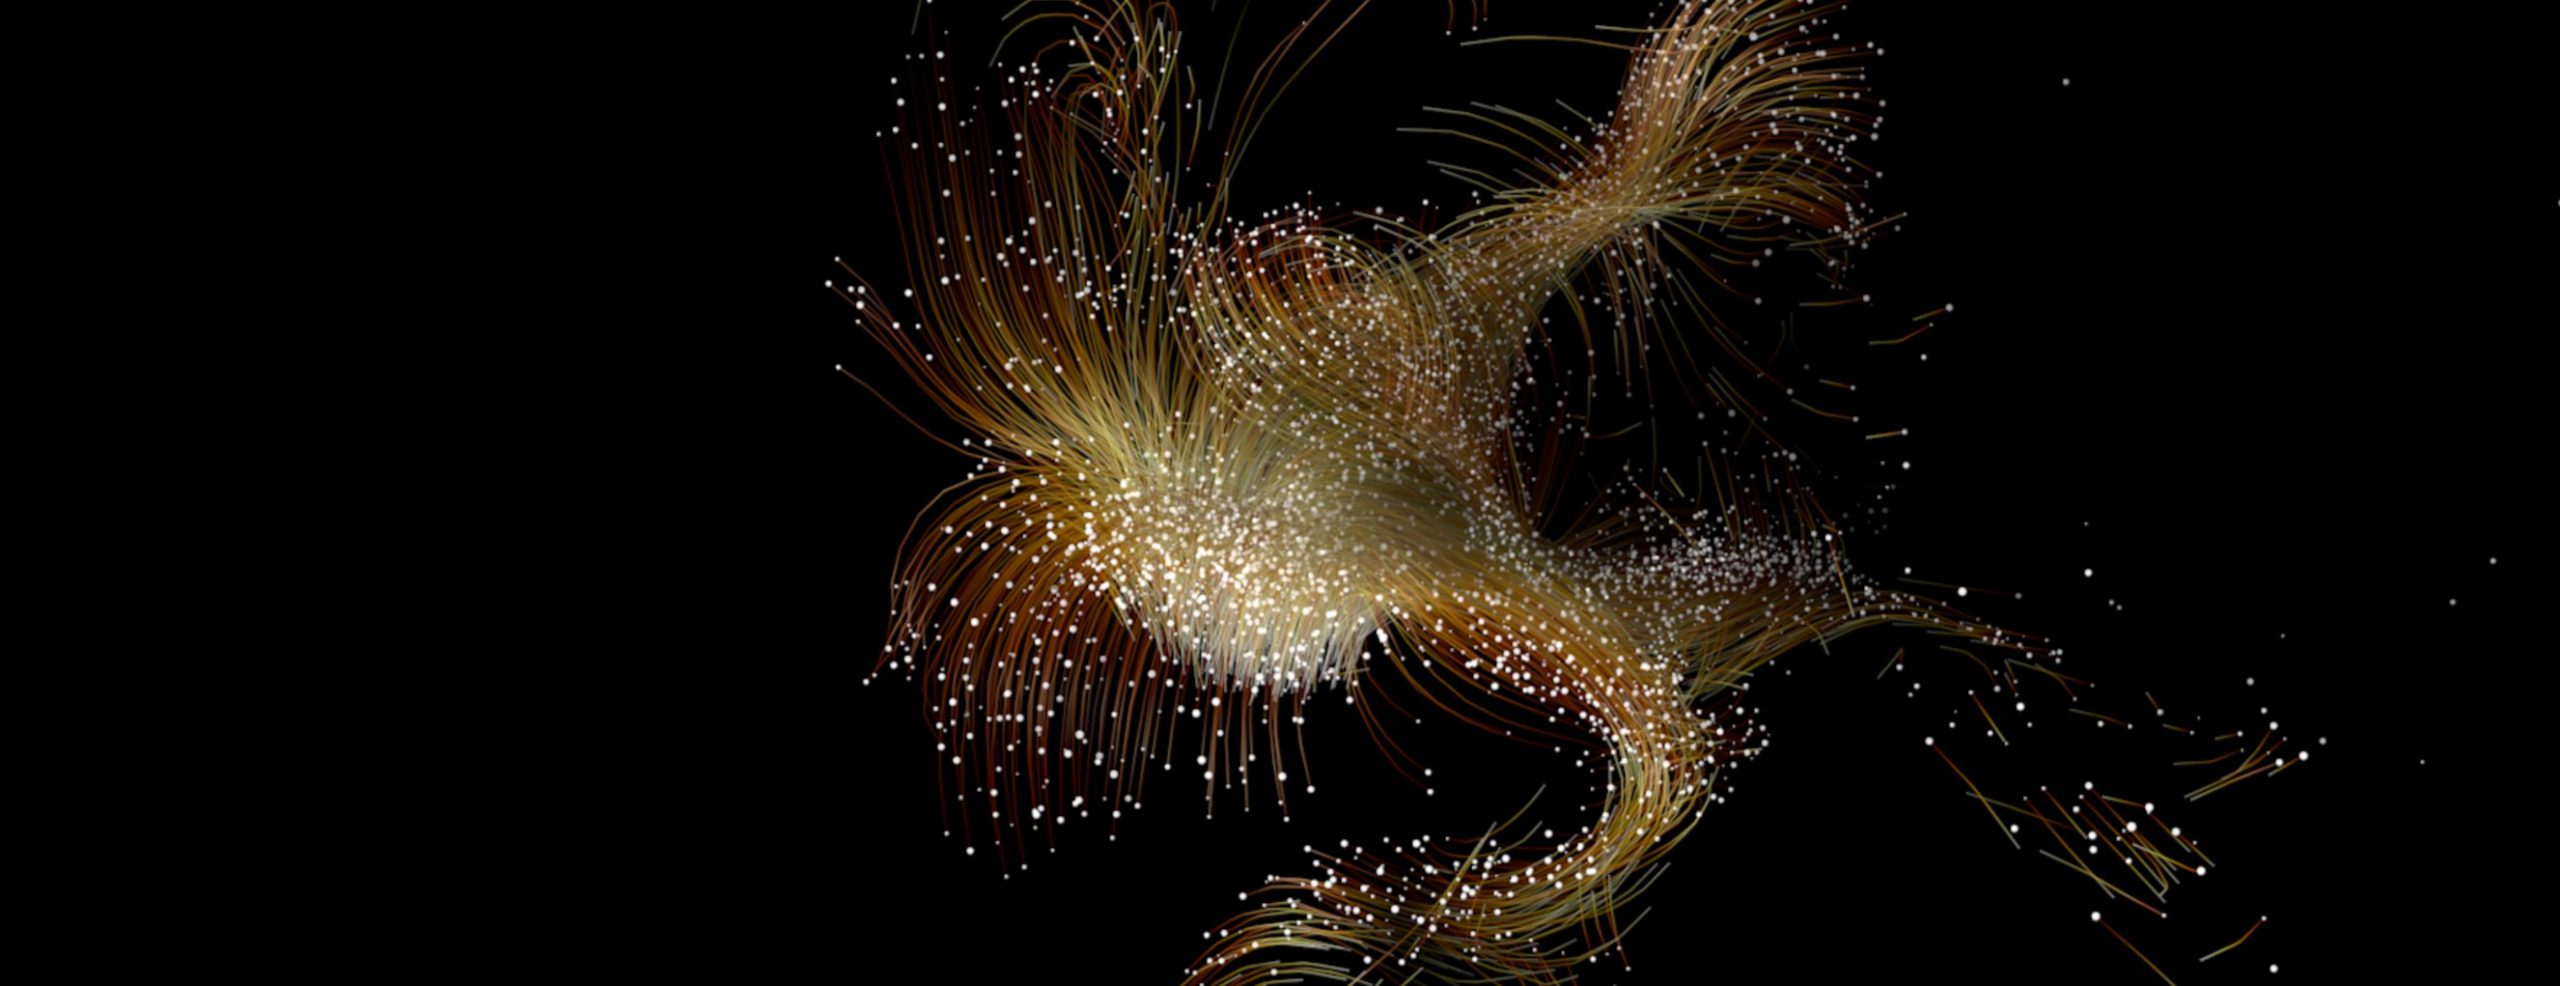
xpVorticityTrails
The original file is a combination of the X-Particles Fluid Domain with xpVorticity and xpTrails. The Domain Object is used for calculating FLIP Fluid simulations, but can also be useful for more abstract results which retain the organic fluid nature.

With R23 and XP4, the xpVorticityTrails modifier has gone and there are more advanced fluid dynamic tools. So I included the original XP3 version and then updated this using the Field Force modifier using turbulence and also combining it with the Domain to create lovely flowing lines.
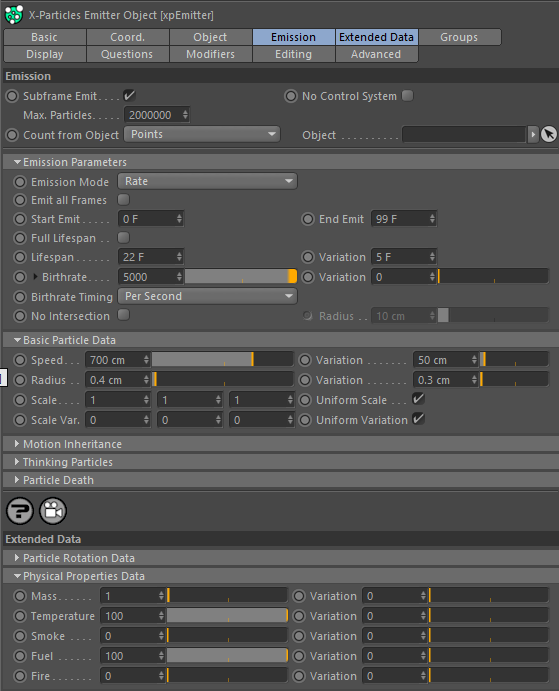
The Emitter is creating particles with Physical Properties which are set in the Extended Data tab. This allows you to control particle mass, temperature and fuel, etc. The xpTrail object is used to create splines from the particle motion, however when a particle dies, the spline created will also disappear.
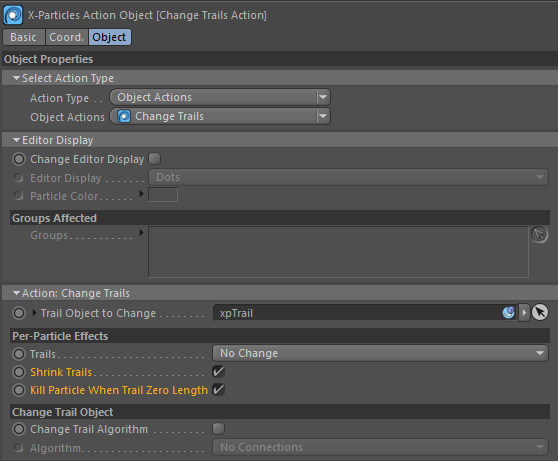
To stop the splines popping off, firstly the particle age is determined with a question, when the particle age is greater than 15 frames, the Change Trails Action is triggered. This has the option to shrink the trail and also kill the particle when the trail is zero length.
xpSmokeSkull
This file is not dissimilar to the earlier xpVolumetricSkull, however this time, we are emitting into the volume of the skull model, rather than across the surface. The scene is rendered using the xpMaterial with Volumetrics enabled. I’ve also used Density Mode with the xpMaterial Volume Modifier to control the colour within the volume. The result is this smokey type render. With some lighting changes and a little tweaking this would be great for rendering big fluffy clouds too.
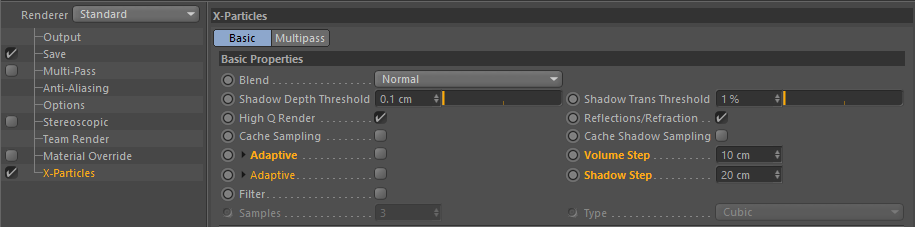
This type of Volumetric rendering can be slow and is also dependent on the size of the scene. Each volume is essentially chopped into sections and stepped through and the size of each step controls the amount of detail and the speed of the rendering.
In the X-Particles Render Settings, there is an option to control the Volume Step and Shadow Step. Set these values high for speedier less detailed renders when experimenting and then reduce them down for more detailed output. You need to find the sweet spot between artifact free renders and acceptable time, so it’s worth spending a bit of time fine tuning these parameters before committing to a full animation render.
To be honest, these days you’d use a GPU renderer such as Redshit or Octane, or a robust solution such as Arnold for volume rendering. But even so, the XP rendering engine is pretty versatile and can produce some great results.
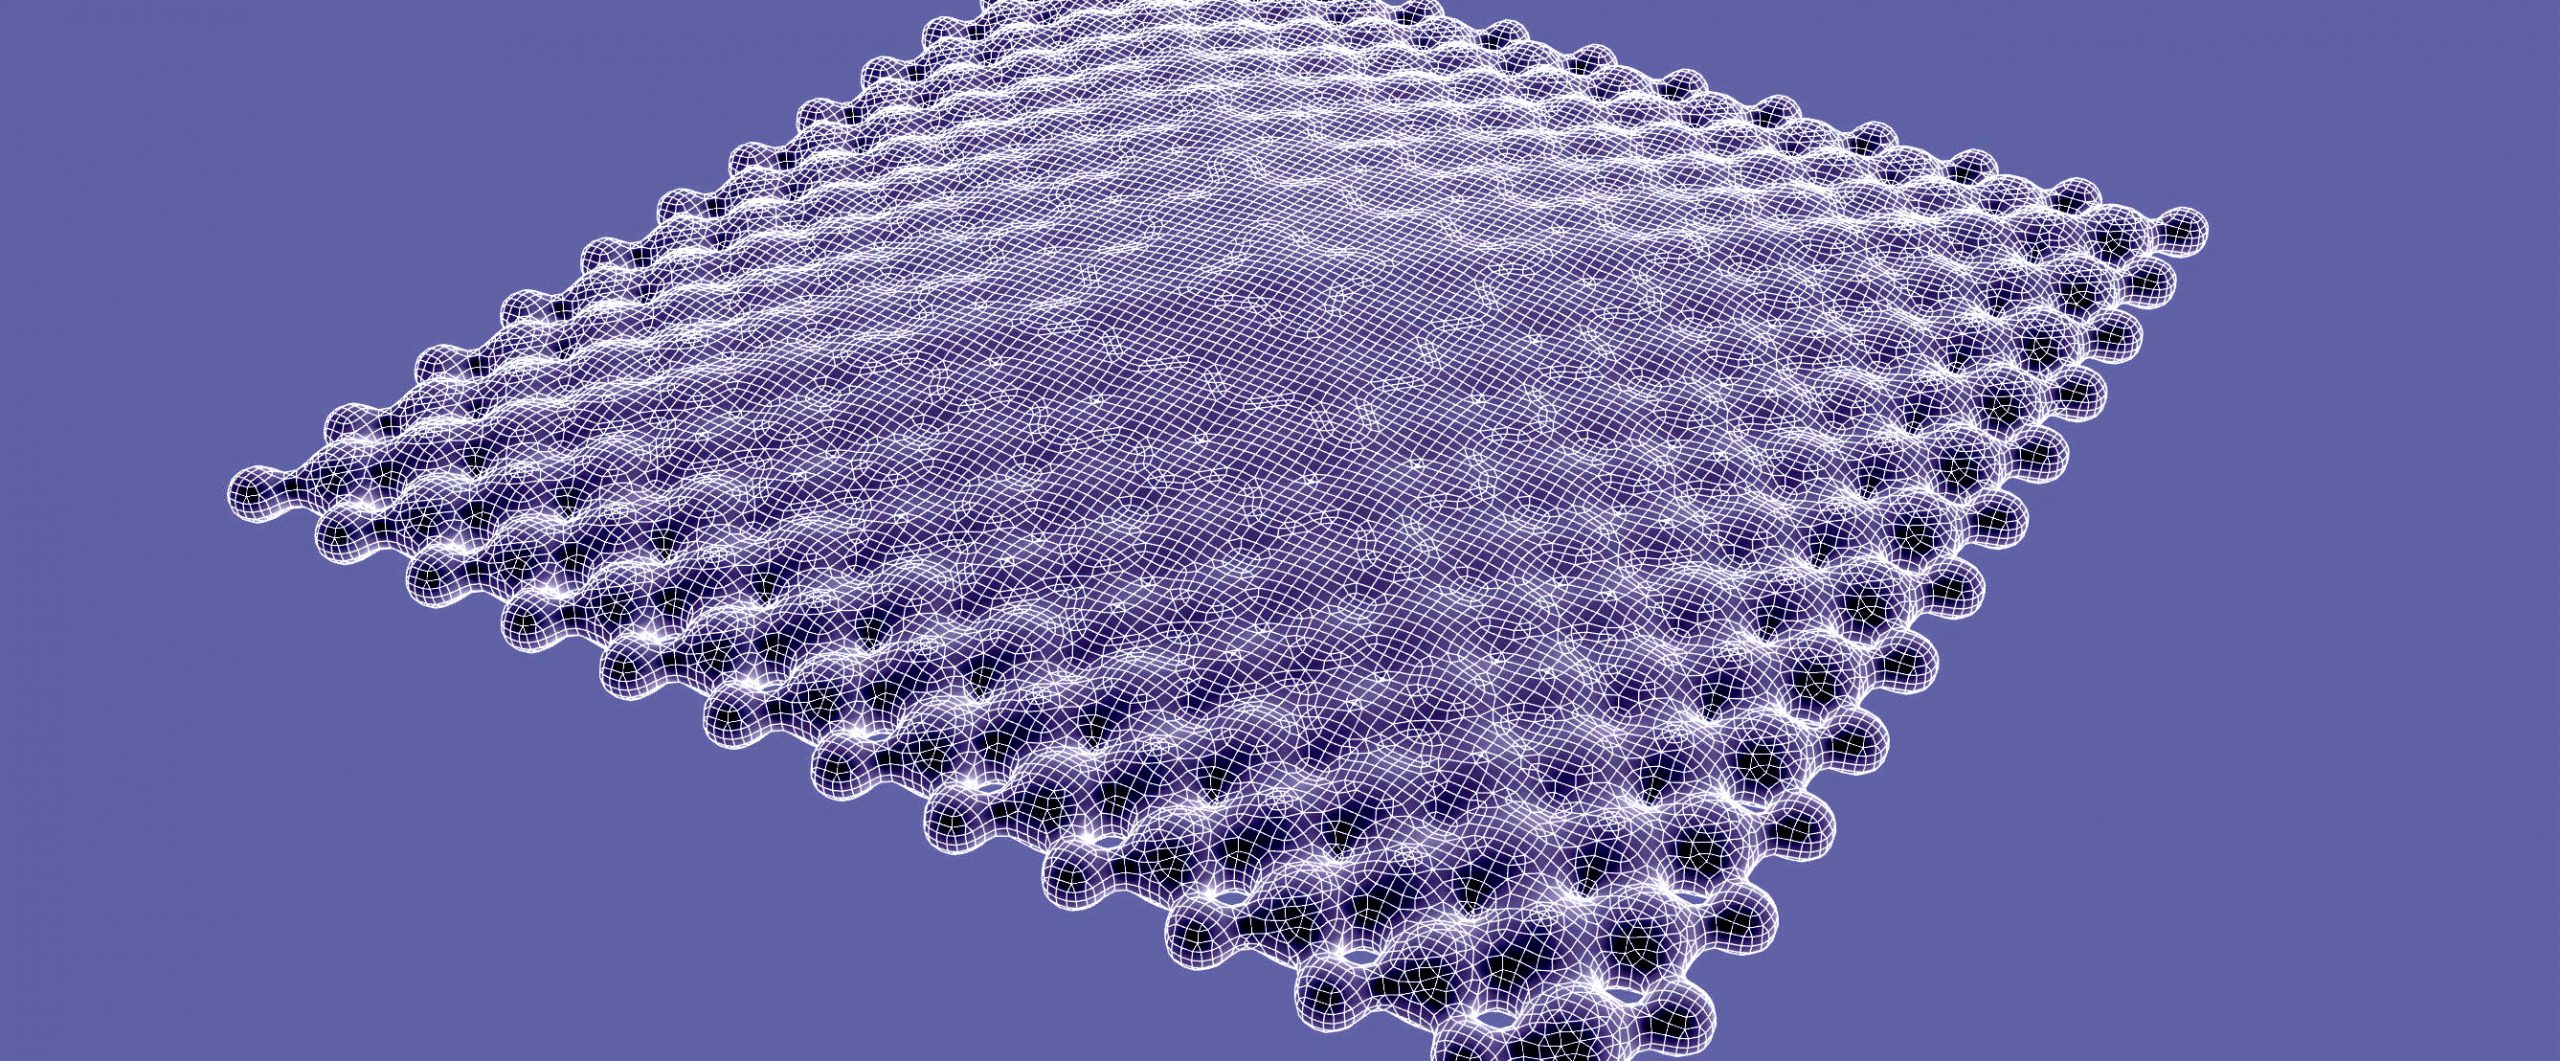
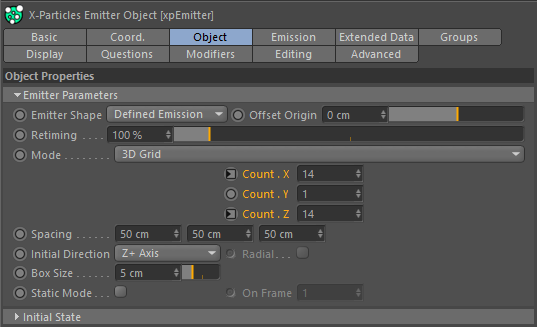
xpDefinedEmission
Did you know that you can use X-Particles to create grid arrays and other predefined shapes, just like you can with a cloner? In this example, I’ve used Defined Emission as the Emitter Shape, with Mode set to 3D Grid. Next, drop this into an xpSkinner to create some geometry for rendering.
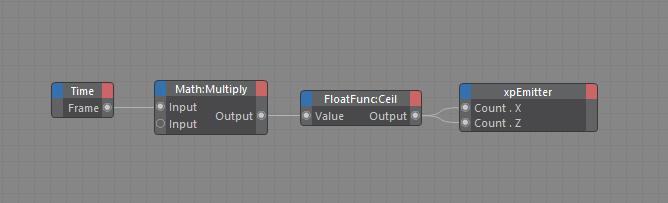
To make this a little more interesting, I’ve added a small Xpresso setup which animates the Grid X & Y Count based on the current frame. The result is this plane of particles which continues to grow over time. In the scene there is also an xpScale Modifier, which increases the Particle Radius over time for a slightly different result. If I remember correctly it was Mike Batchelor who inspired this technique, thanks Mike!

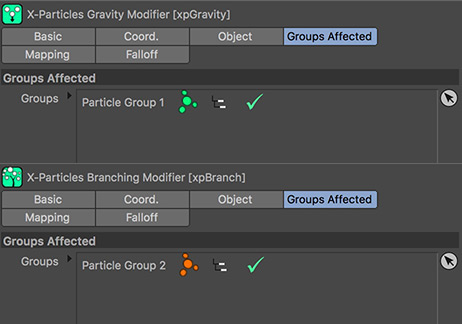
xpGrowGrass
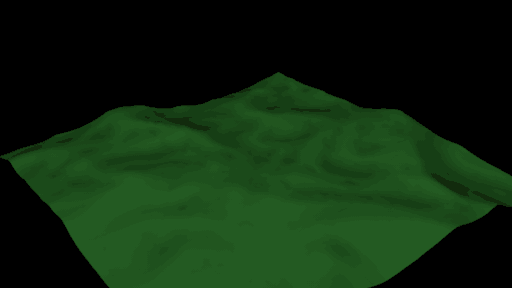
Let’s all grow grass, yeah! This set up shows you a method for spawning from particle collisions. The spawned particles are then used to create splines using a combination of xpBranching and xpTrail.
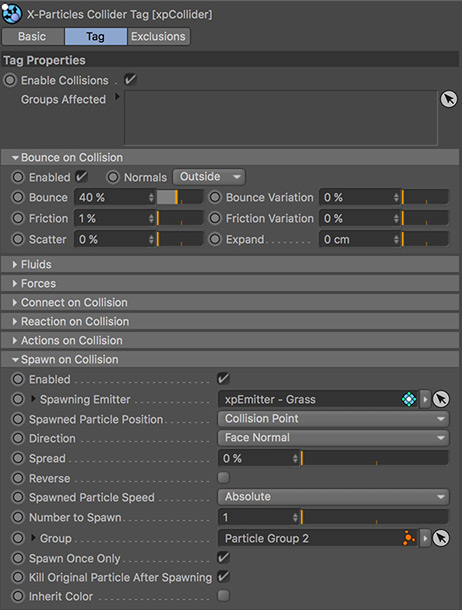
The xpCollider Tag has the option to Spawn Particles from the point of collision. You can see that I’ve also allocated the new spawned particles to Group 2. By using groups we can isolate the effect of modifiers to certain particles and omit from others. You can see here that Gravity only affects Group 1 and the xpBranch mod only affects Group 2.
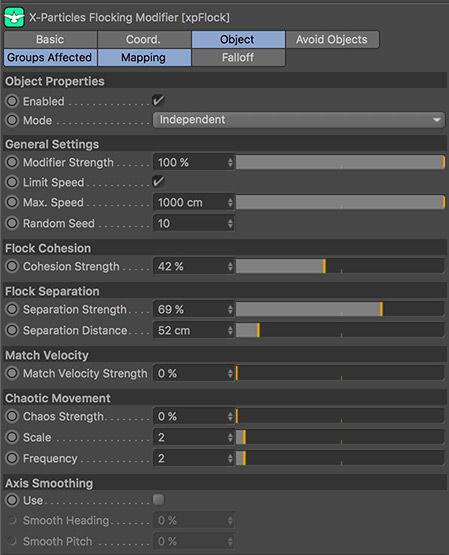
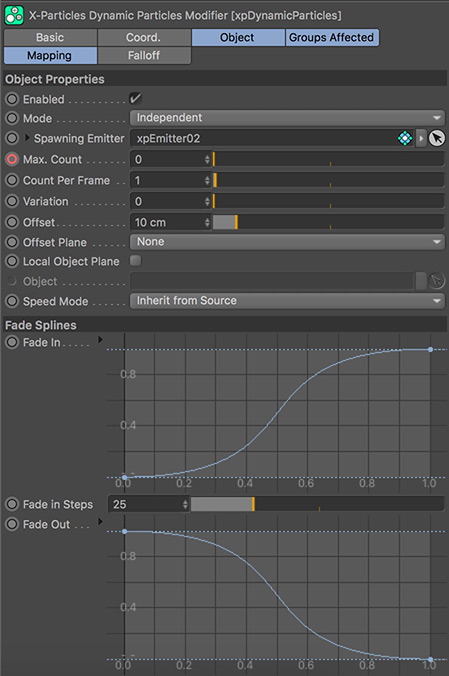
xpDynamicFlocking
HO HO HO! It must be Christmas? This set up shows a couple of nice features of X-Particles. First of all we look at creating a flocking simulation with the xpFlocking Modifier. This also has the Flocking Helper which allows you to attract, repel or even chase the particles. Using these mods allows you to create flocking birds, shoals of fish or even leaves blowing in the wind.
I’ve also included the xpDynamicParticles Modifier. This mod allows you to dynamically add or remove particles from the simulation. In this scene I’ve added the additional particles to a new group which is orange, you can see the extra particles being added and then removed through the animation.
You made it!
To download the files click on the button all the way back up there ☝